Add Resource Files
On This Page
How do I upload files to Resources?
-
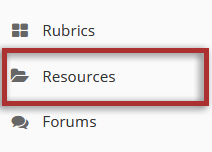
Select the Resources tool from the Tool Menu in the site.
-
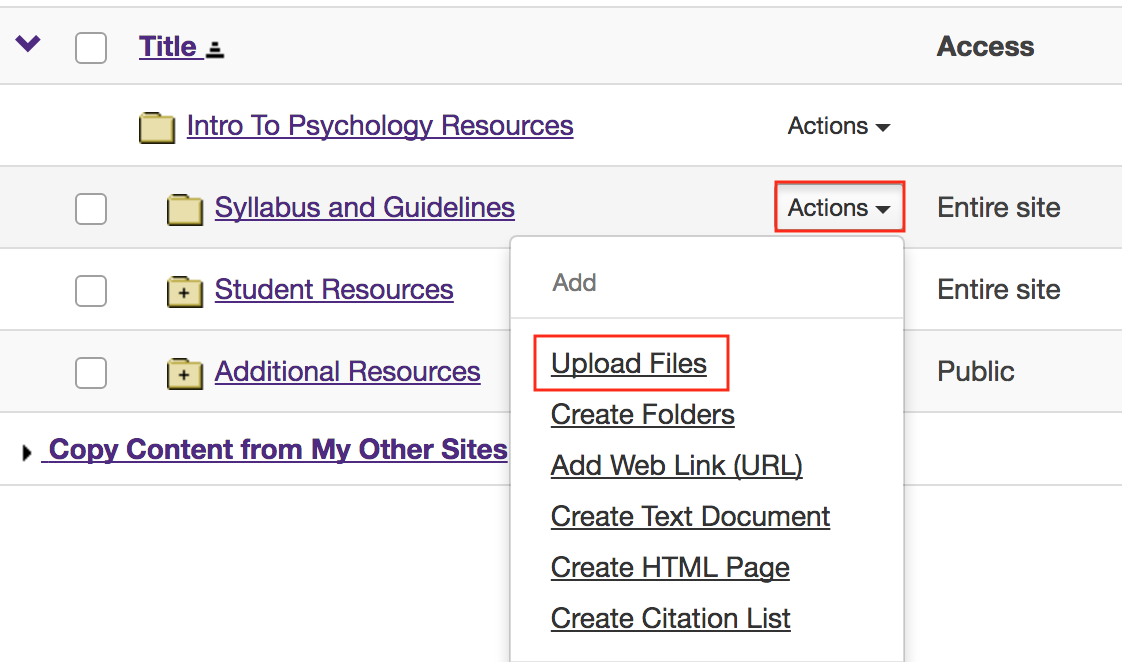
Click Actions, then Upload Files.
To the right of the folder to which you want to add files, click the Actions dropdown menu and select Upload Files.
If you have not created any folders yet, use the site's root folder (bearing the name of the site) to add files.
-
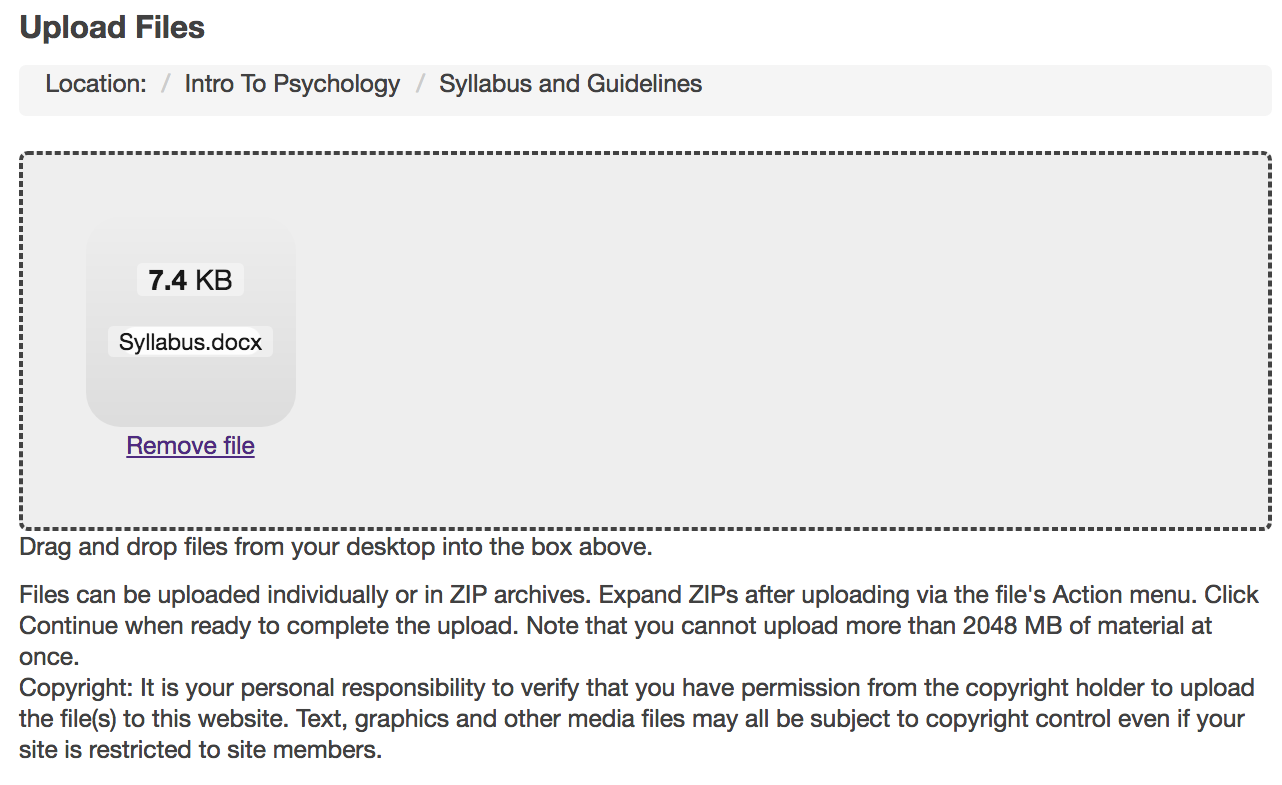
Option 1: Drag and drop files from your computer.
Drag files from your computer and drop them in box marked "Drop files to upload".
This will display thumbnails of the files that will be uploaded.
-
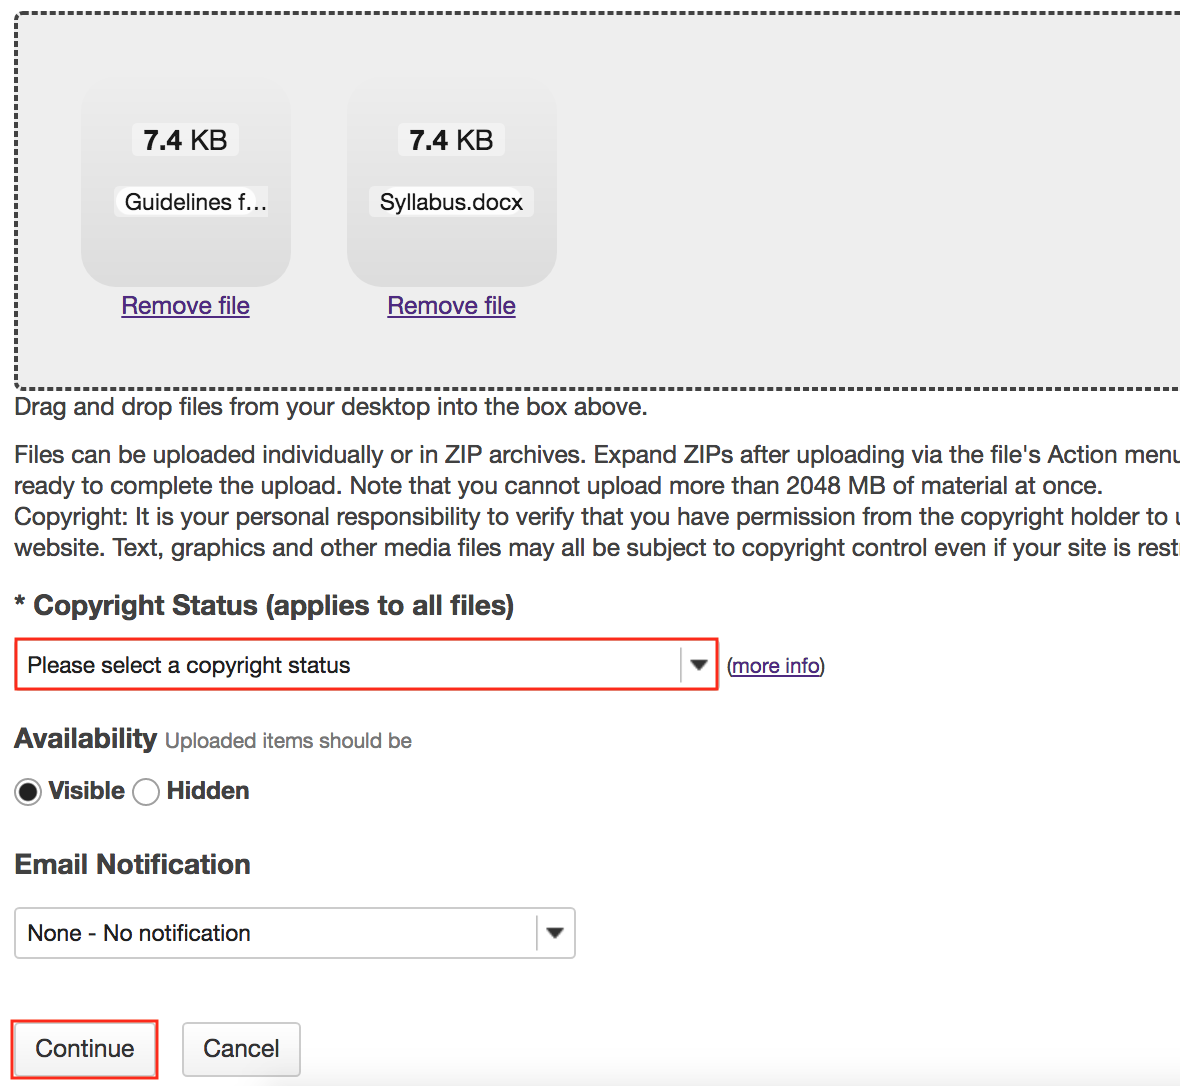
Select a Copyright Status from the dropdown menu that applies to all files.
Click Continue to finish uploading the files.
-
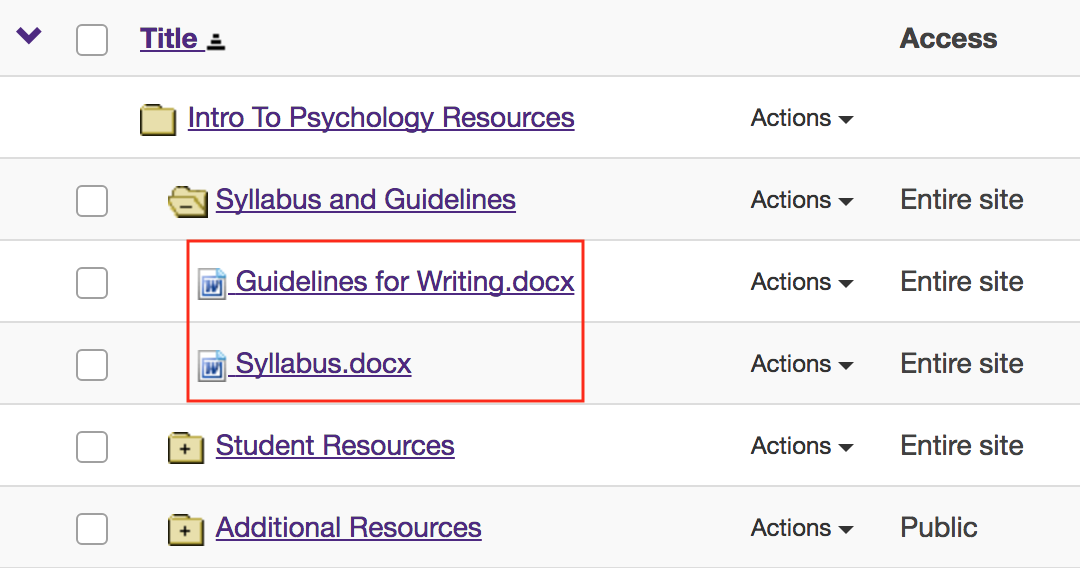
View files in Resources.
The files are now located inside the selected Resources folder.
-
Option 2: Browse your computer for files.
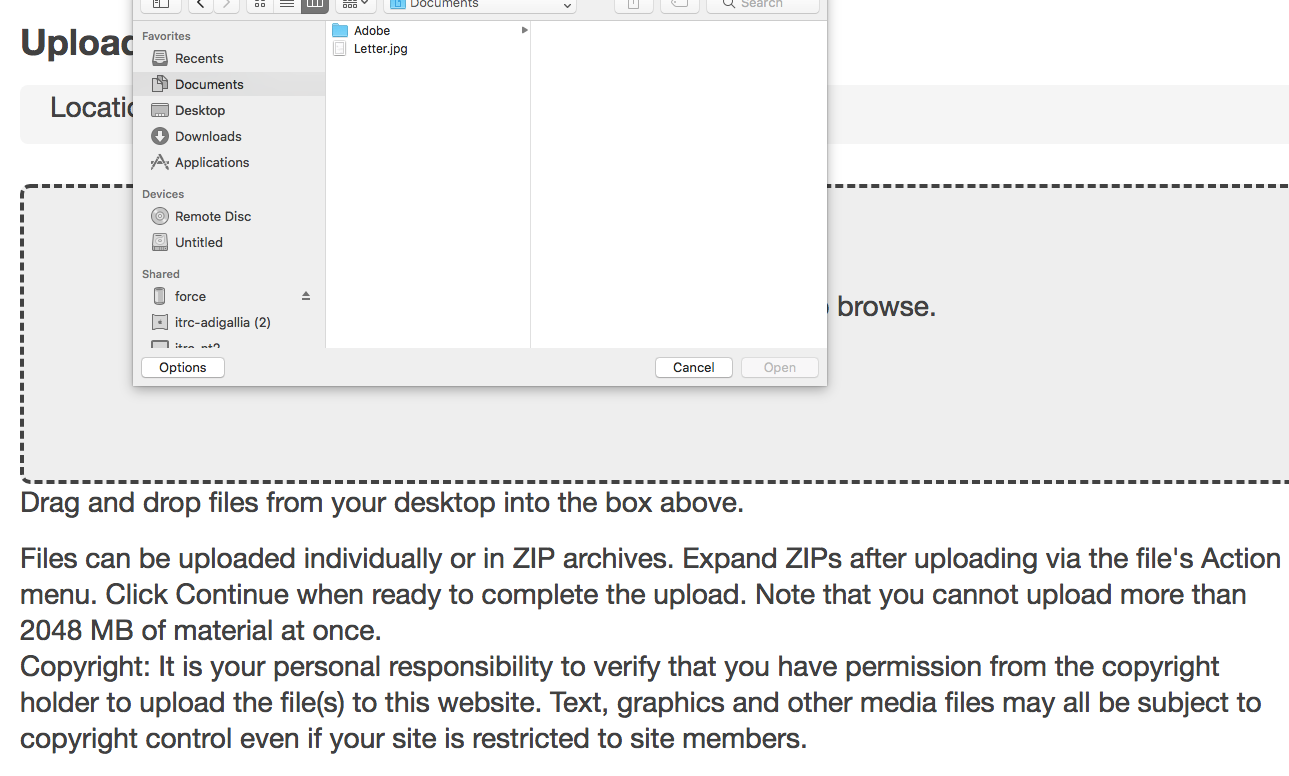
Click in the box labeled "Drop files to upload."
This will open your computer's File Upload window.
-
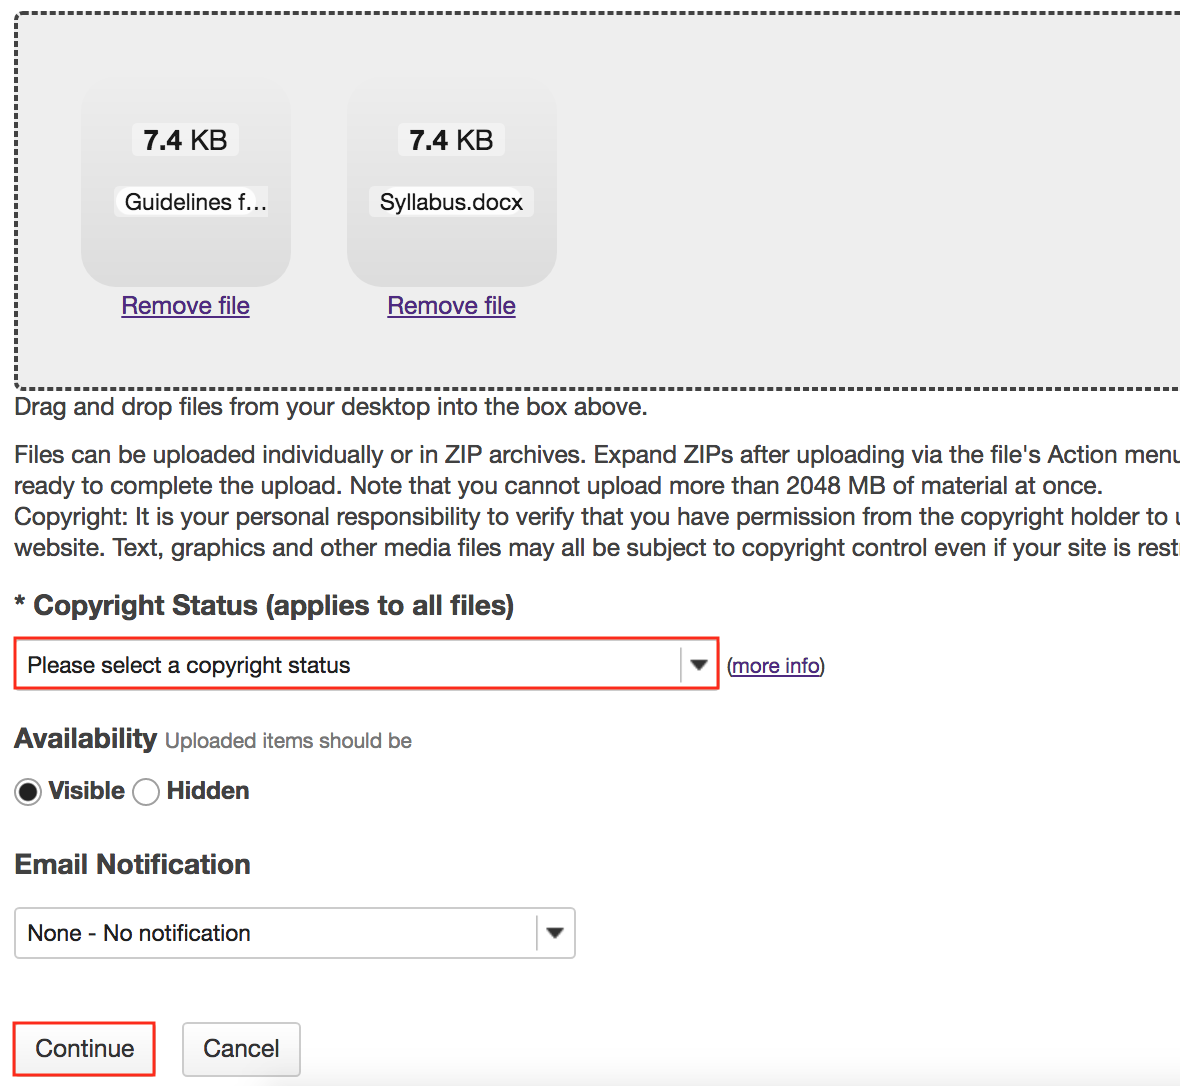
Select the file(s) to upload and press Open
The selected files will display in upload field. Select the Copyright status from the dropdown menu and click Continue to finish uploading the files.
-
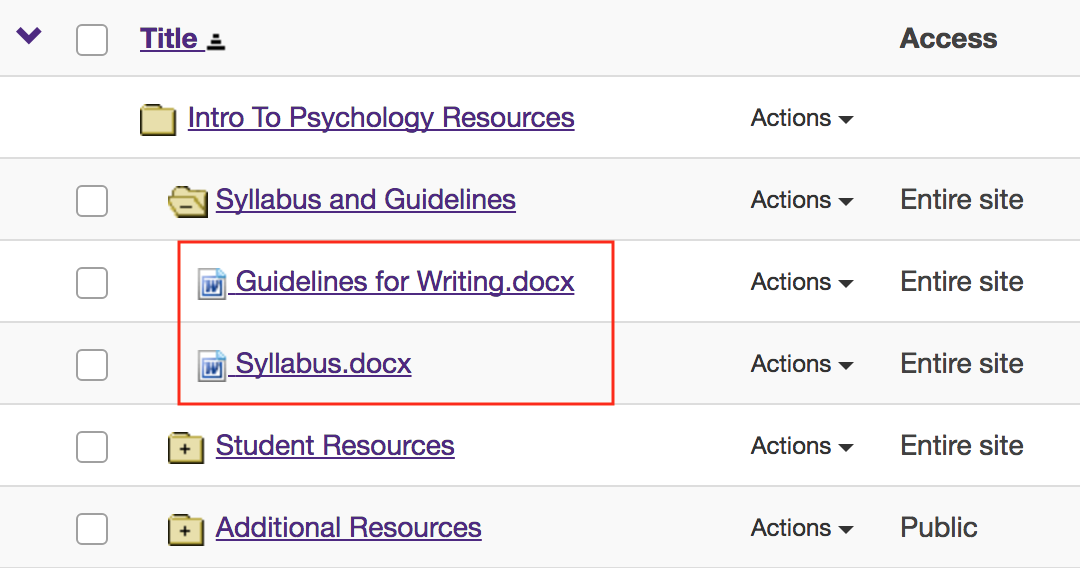
View files in Resources.
The files are now located inside the selected Resources folder.
How do I upload a new version of a file in Resources?
If a file is linked and active elsewhere in your course site - such as in a Lessons module or an image in a quiz - deleting it from Resources and uploading a new file in its place will break the link. By uploading a new version, your existing links remain intact.
-
Select the Resources tool from the Tool Menu in the site.

-
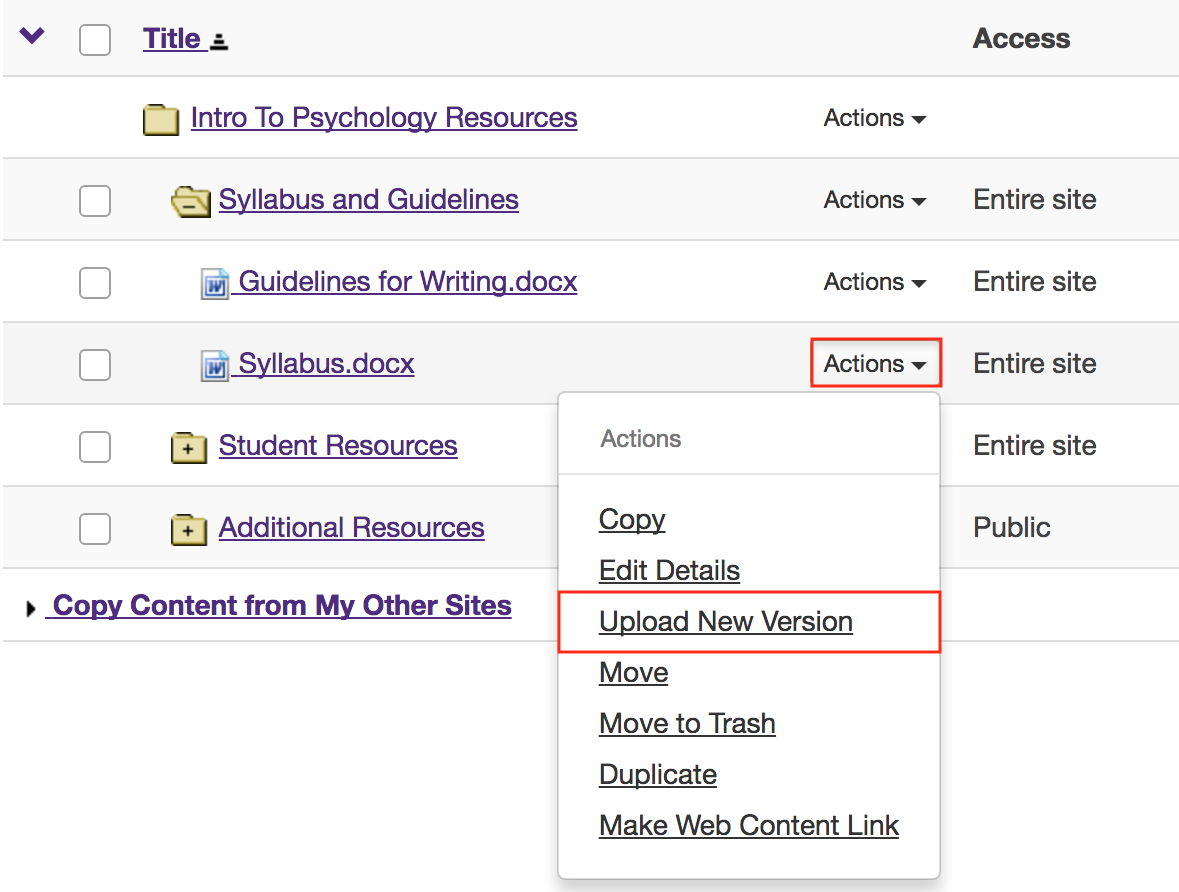
Click Actions, then Upload New Version.
To upload a new version of a file, to the right of the file to replace, from the Actions drop-down menu, select Upload New Version.
This displays the Upload New Version page.
-
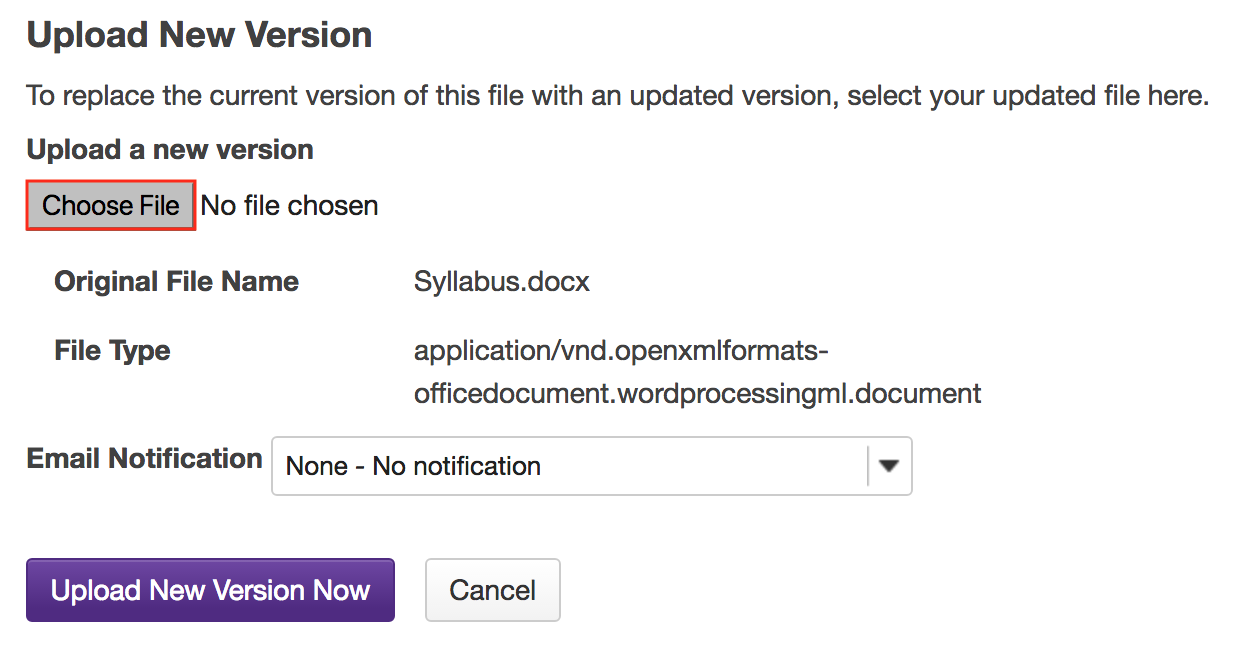
Click Choose File to locate and select the file on your computer.
This returns the display to the Upload New Version page with the name of the new file.
-
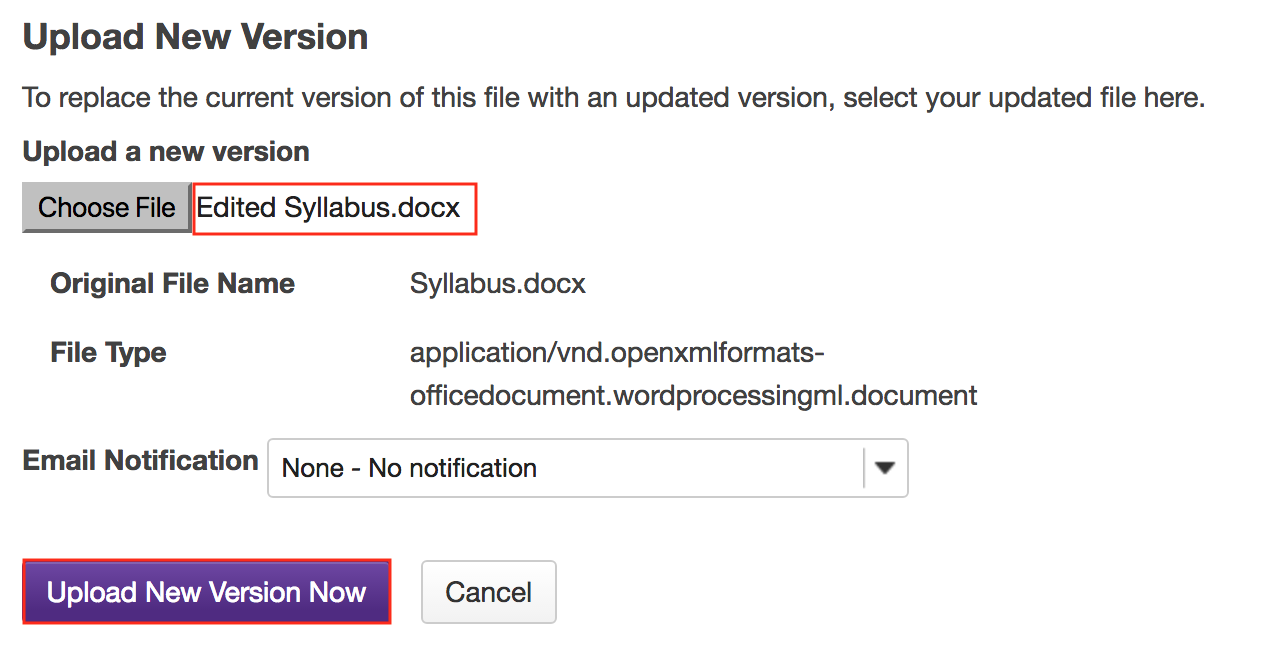
Click Upload New Version Now.
The file name of the new file is displayed.
-
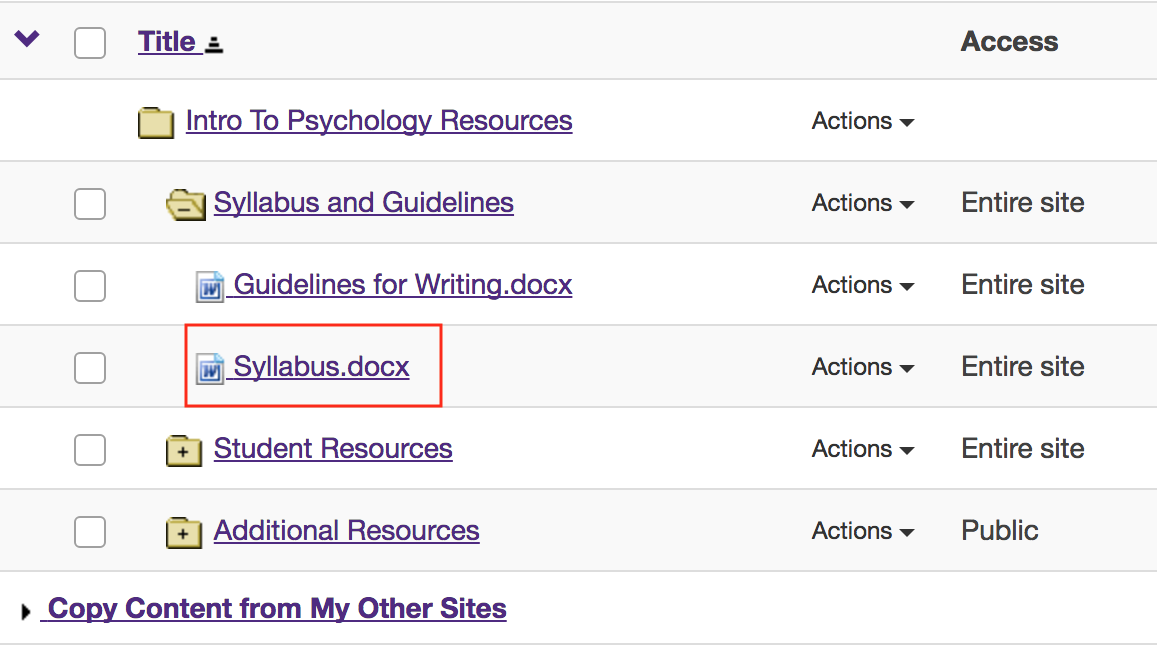
Original file is replaced.
This replaces the original file with the new revised file.
Note: The display name for the new file remains the same as the original file.
How do I add a web link or URL?
Users can create links to web pages in Resources.
-
Select the Resources tool from the Tool Menu in the site.

-
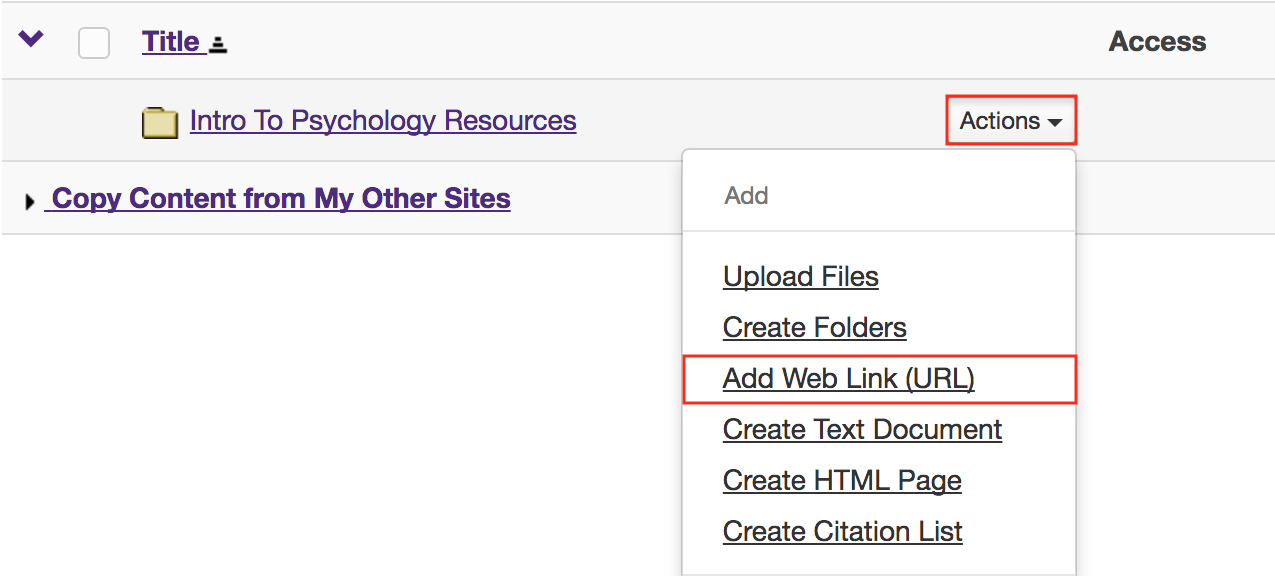
Click Actions, then Add Web Links (URLs).
To the right of the folder to which you would like to add the web link, from the Actions drop-down menu, select Add Web Links (URLs).
This displays the Add Web Links (URLs) page.
-
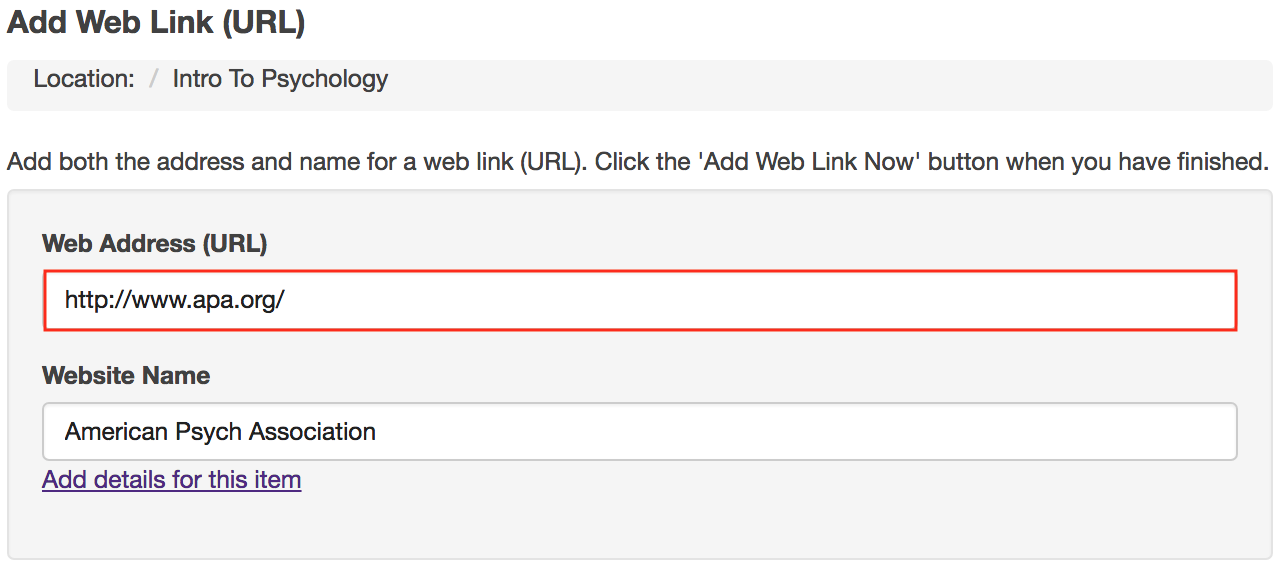
Enter (or paste) the Web Address (URL) (web page address in the top of your browser) and enter a Website Name of the link which will be visible to those accessing the link in Resources.
You may also Add details for this item (Optional)
-
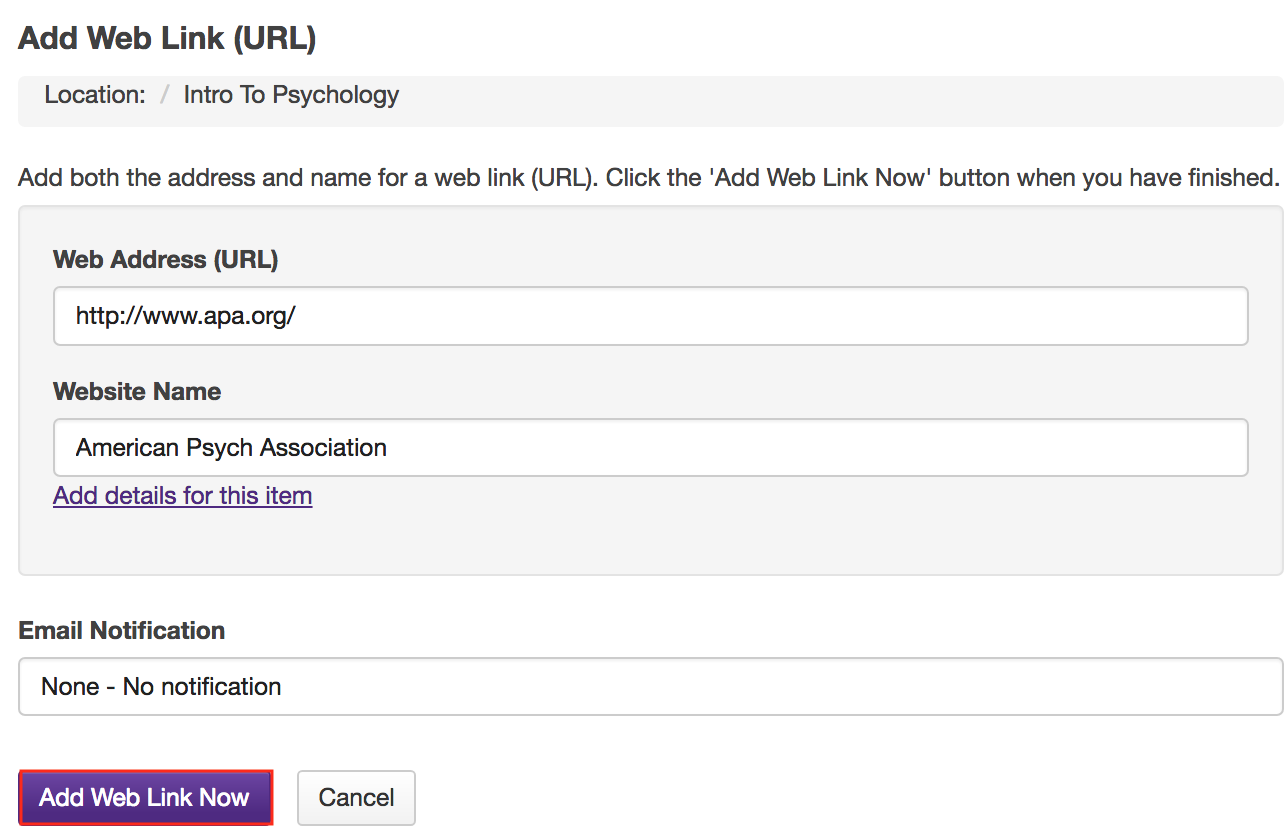
Click the Add Web Link Now button.
-
View links in Resources.
This creates links to the web sites in the selected Resource folder.

How do I create a text document?
-
Select the Resources tool from the Tool Menu in the site.

-
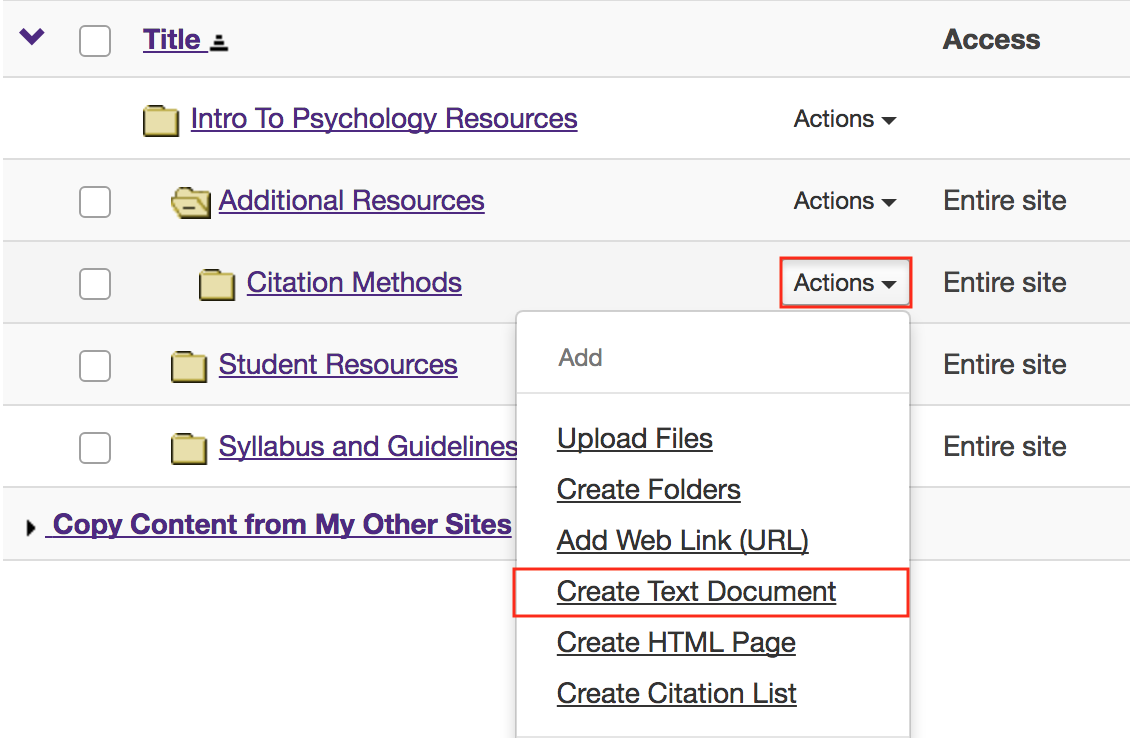
Click Actions, then Create Text Document.
To the right of the folder in which you want to create the text document, from the Actions drop-down menu, select Create Text Document.
This displays the Create Text Document page.
-
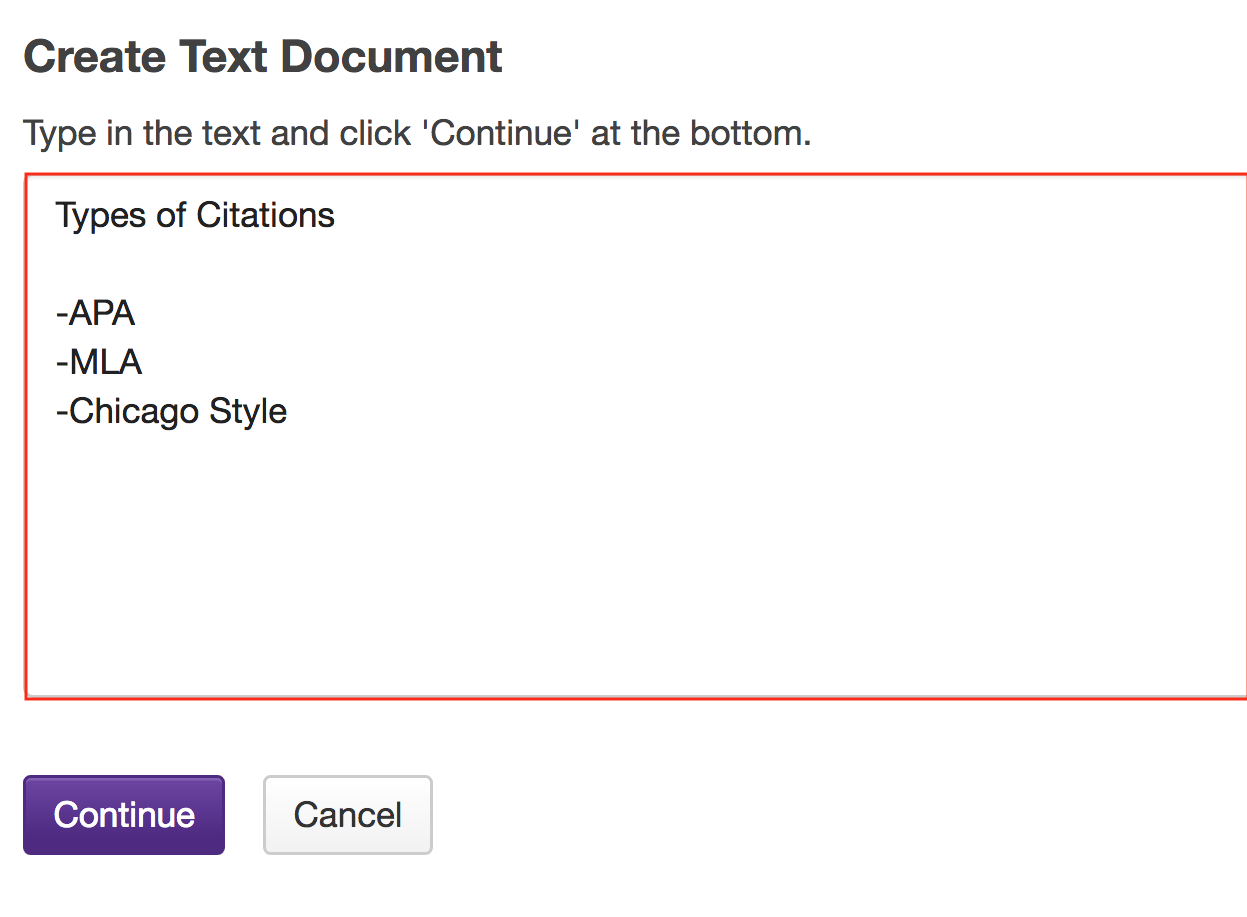
Enter text, then click Continue.
Enter (or paste) the text into the text box, then click Continue.
This displays the details page for the text document.
-
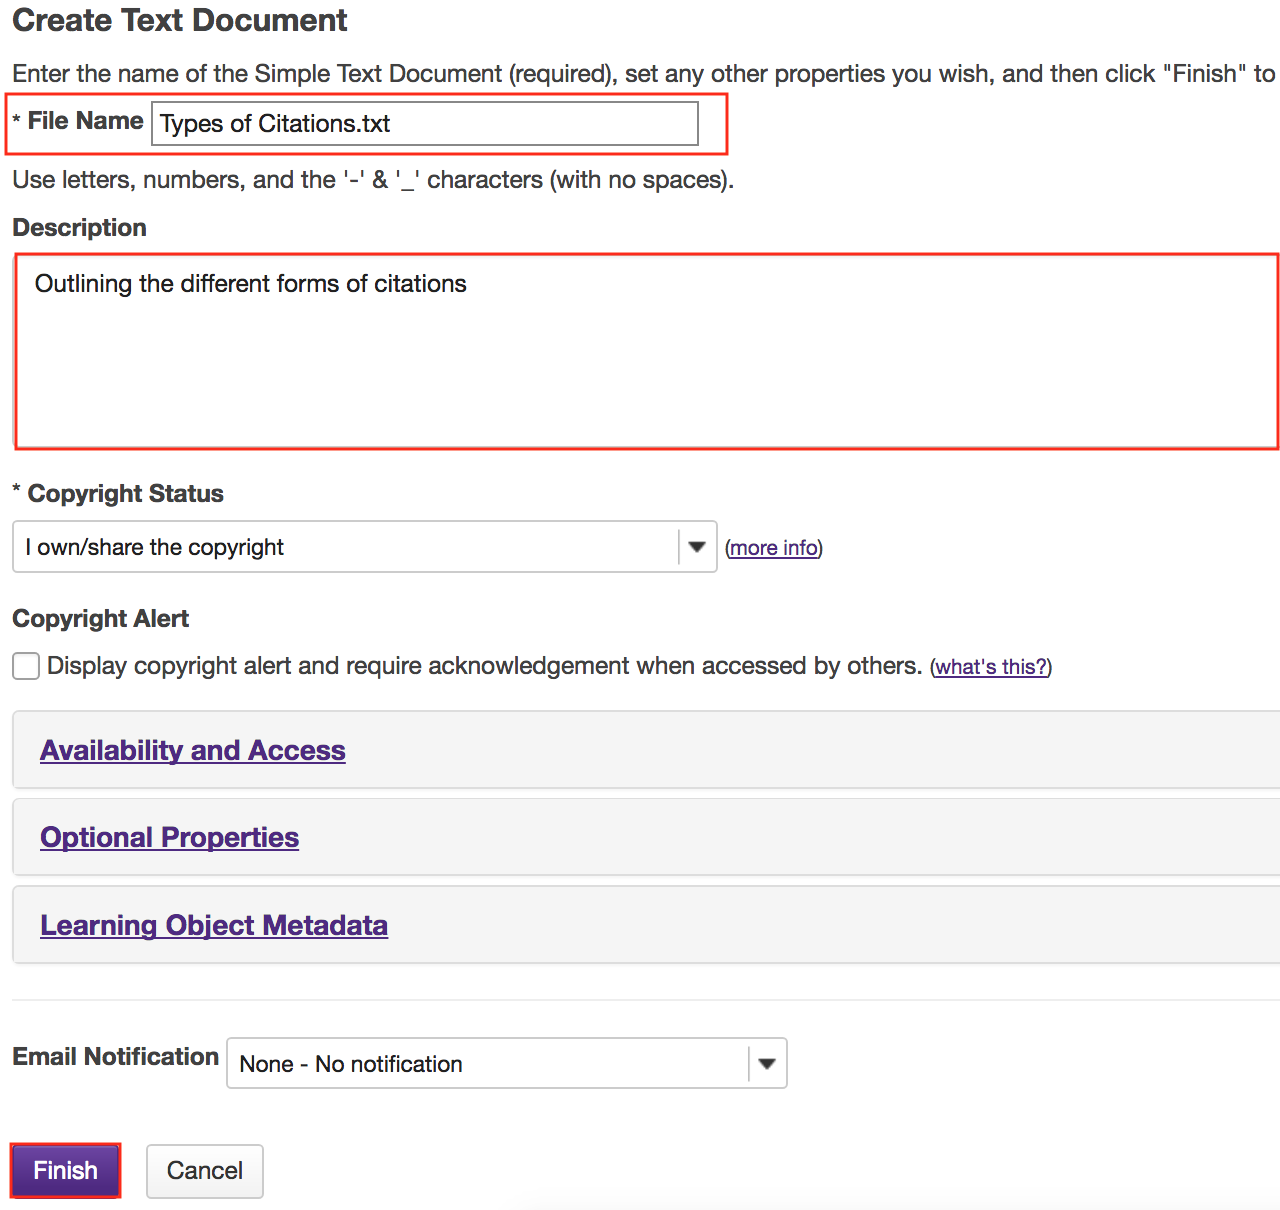
Enter document information.
Enter a display name for the text document, and additional details if needed, then click Finish.
-
View text document in Resources.
The text document has been placed in the selected folder.
Note: You may click on the blue Information icon to the right of the file to see the item description.

How do I create a HTML page?
-
Select the Resources tool from the Tool Menu in the site.

-
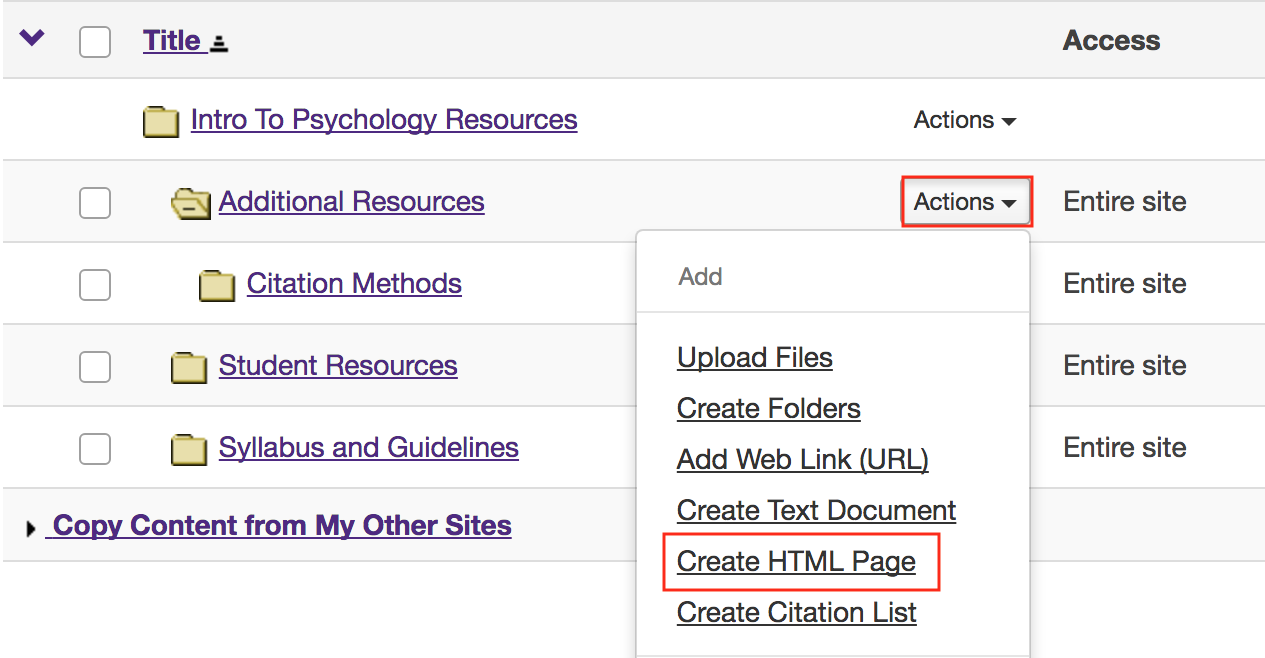
Click Actions, then Create HTML Page.
To the right of the folder where you want to create the HTML page, from the Actions drop-down menu, select Create HTML Page.
This displays the Create HTML page.
-
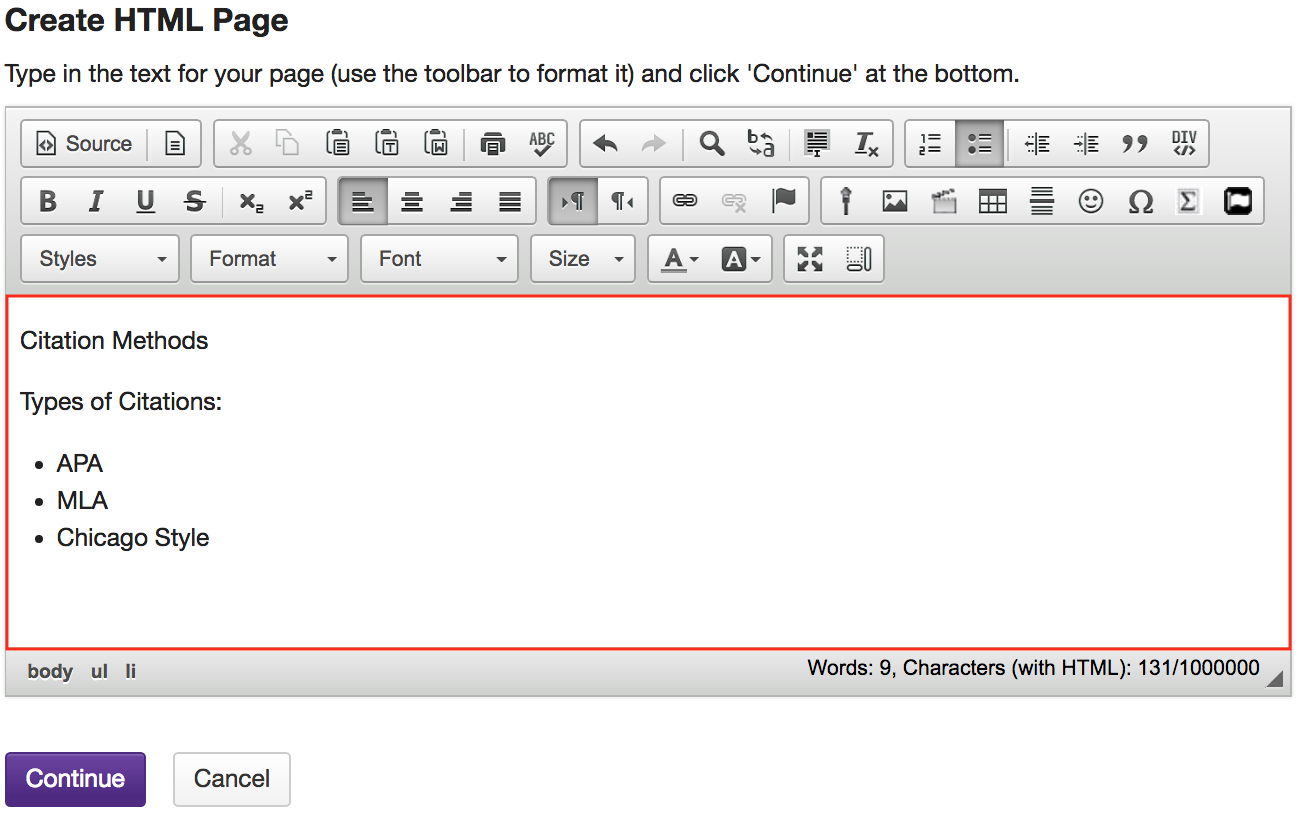
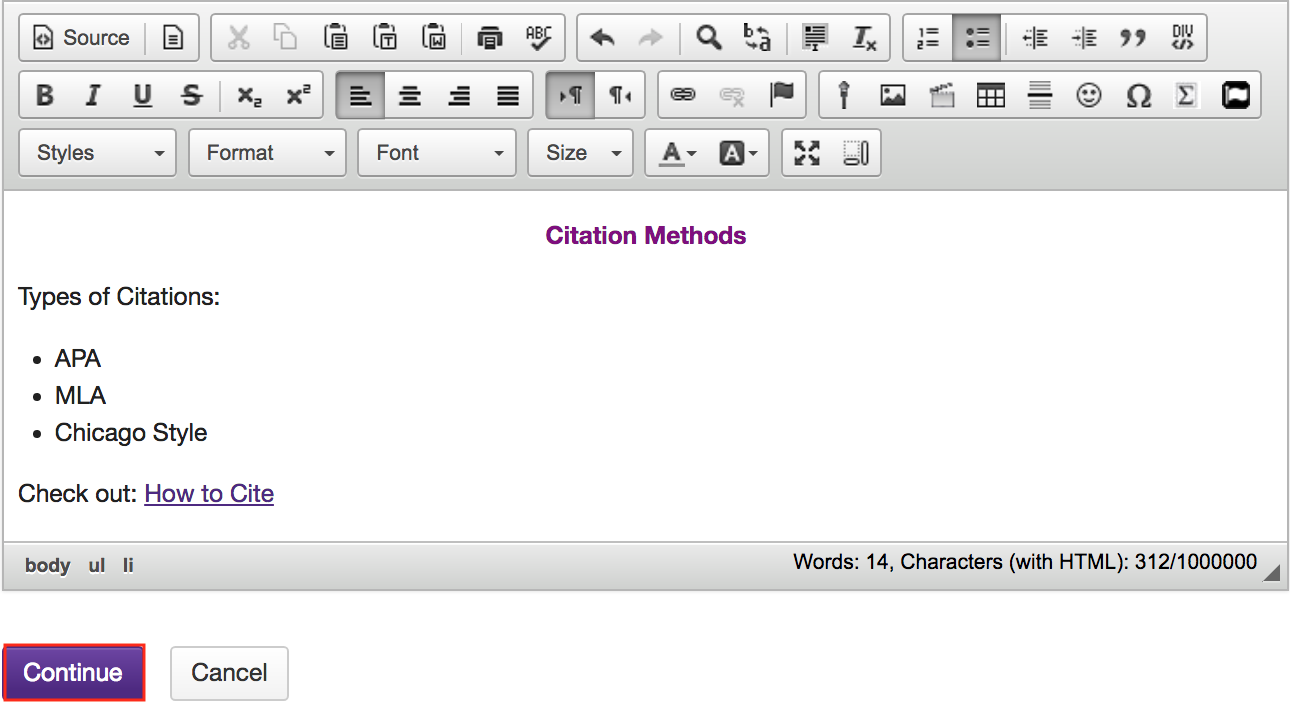
Enter document content.
Enter (or paste) the text content of the document into the text editor.
-
Use the Rich Text Editor to format or add links and media.
Use the Rich Text Editor tools to format the text, add images, links or other HTML items to the document.
Click Continue to save your document when you are finished editing.
-
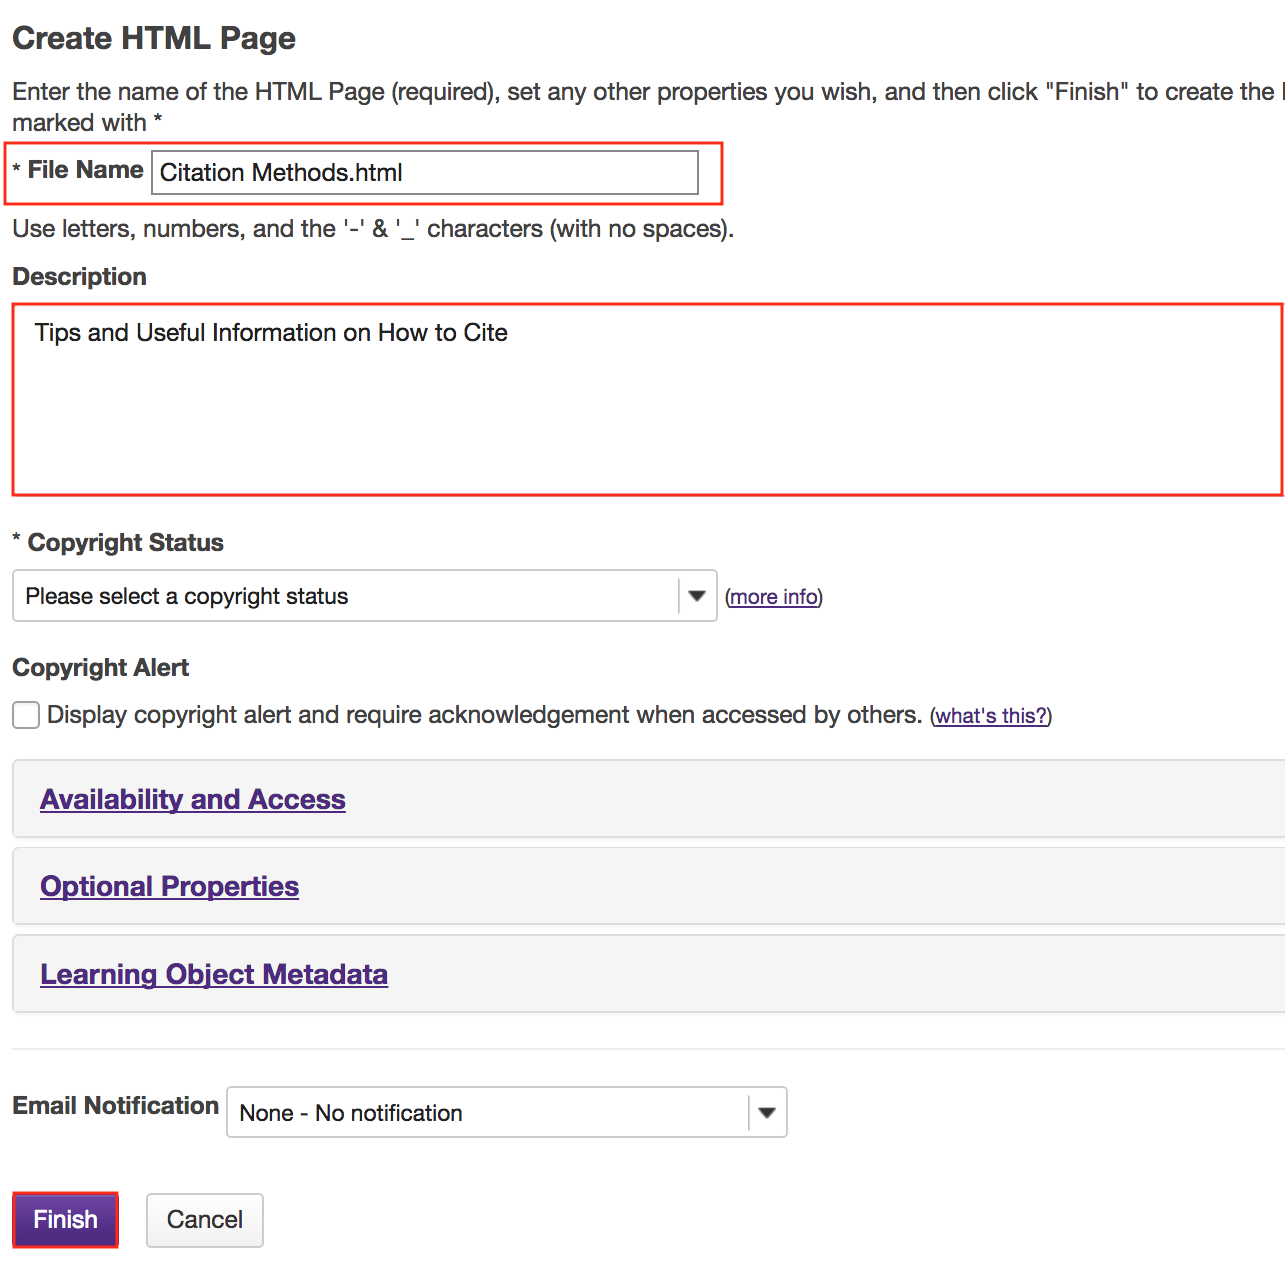
Enter document details.
Enter a display name for the HTML document, and any other information as needed. Click Finish when done.
-
View HTML file in Resources.
The HTML page is created and placed in the selected folder.
Note: You may click on the blue Information icon to the right of the file to see the item description.

How do I create a citation list?
Users can create a citation list for a books, journal articles, manuscripts, newspapers or musical compositions in Resources. There are two methods for creating a citation list.
Method 1: Import a file in RIS (Research Information Systems) format.
Method 2: Manually create list.
-
Select the Resources tool from the Tool Menu in the site.

-
Method 1: Import RIS file.
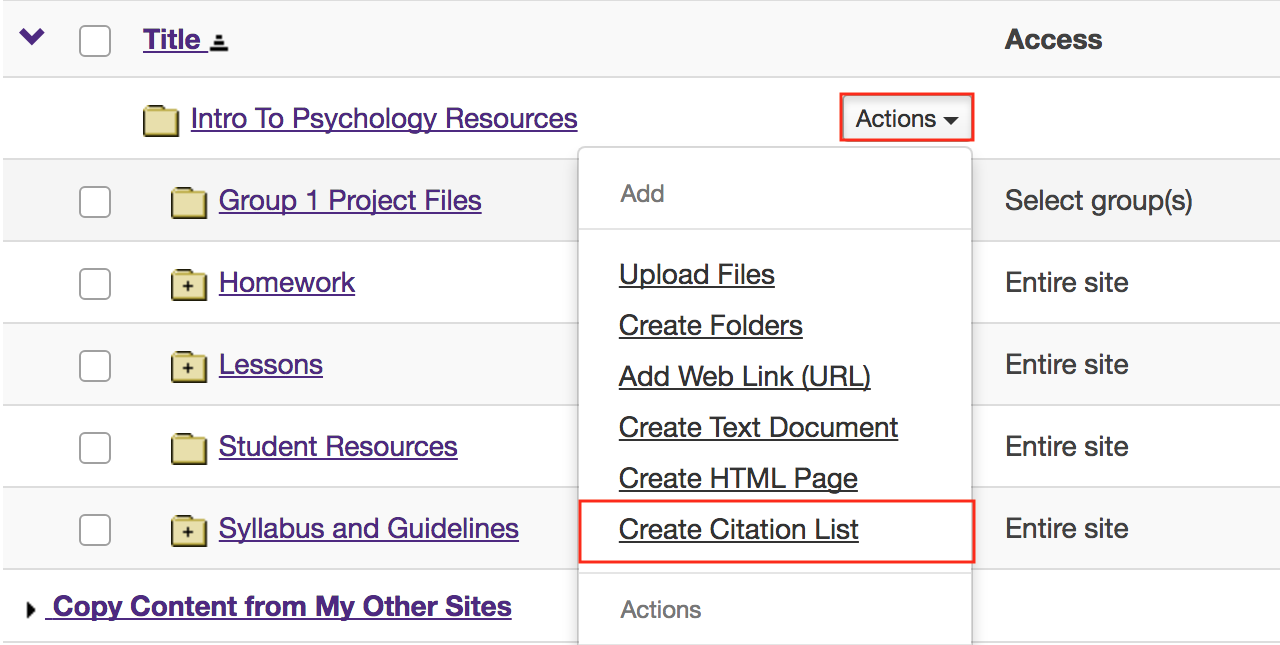
To the right of the folder you want to import the RIS citation list, from the Add drop-down menu, select Create Citation List.
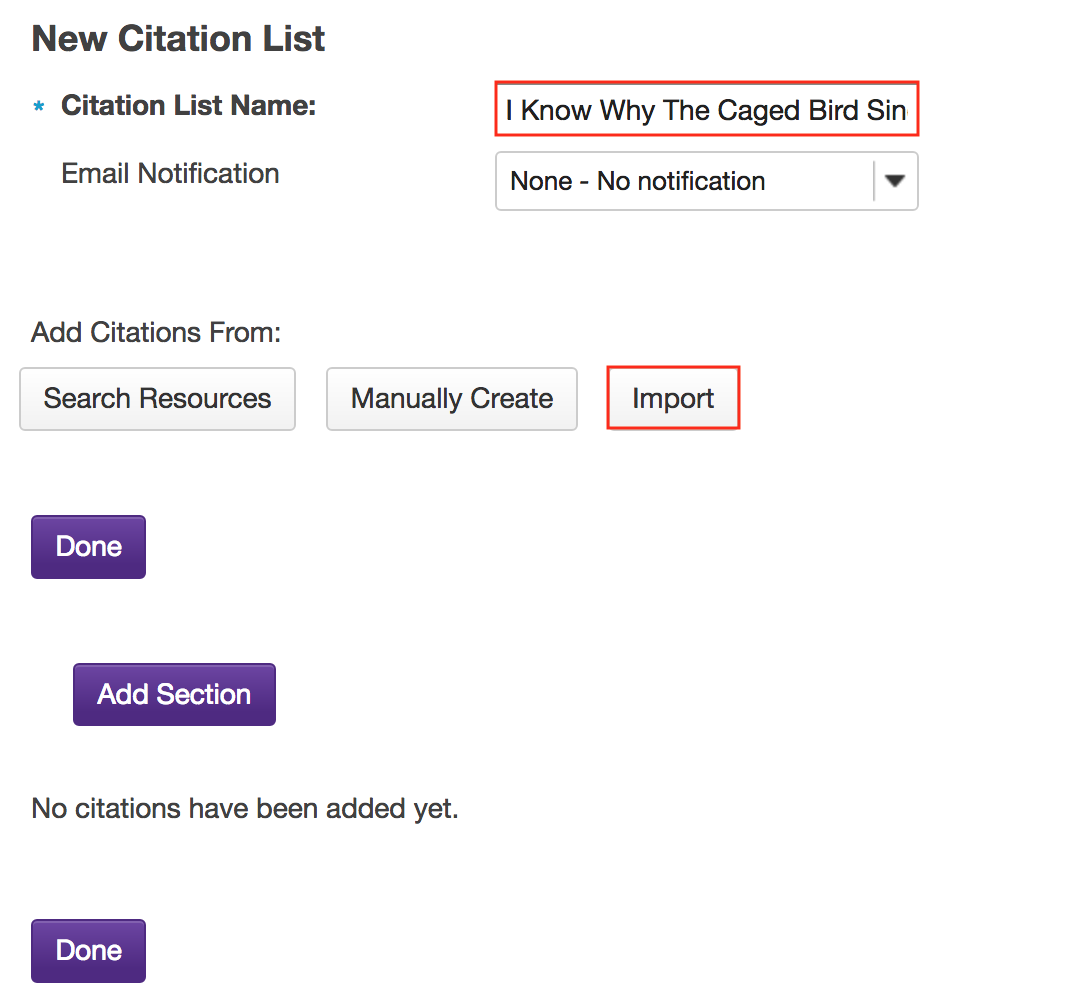
This displays the New Citation List page.
Enter a name for the citation list, then click Import.
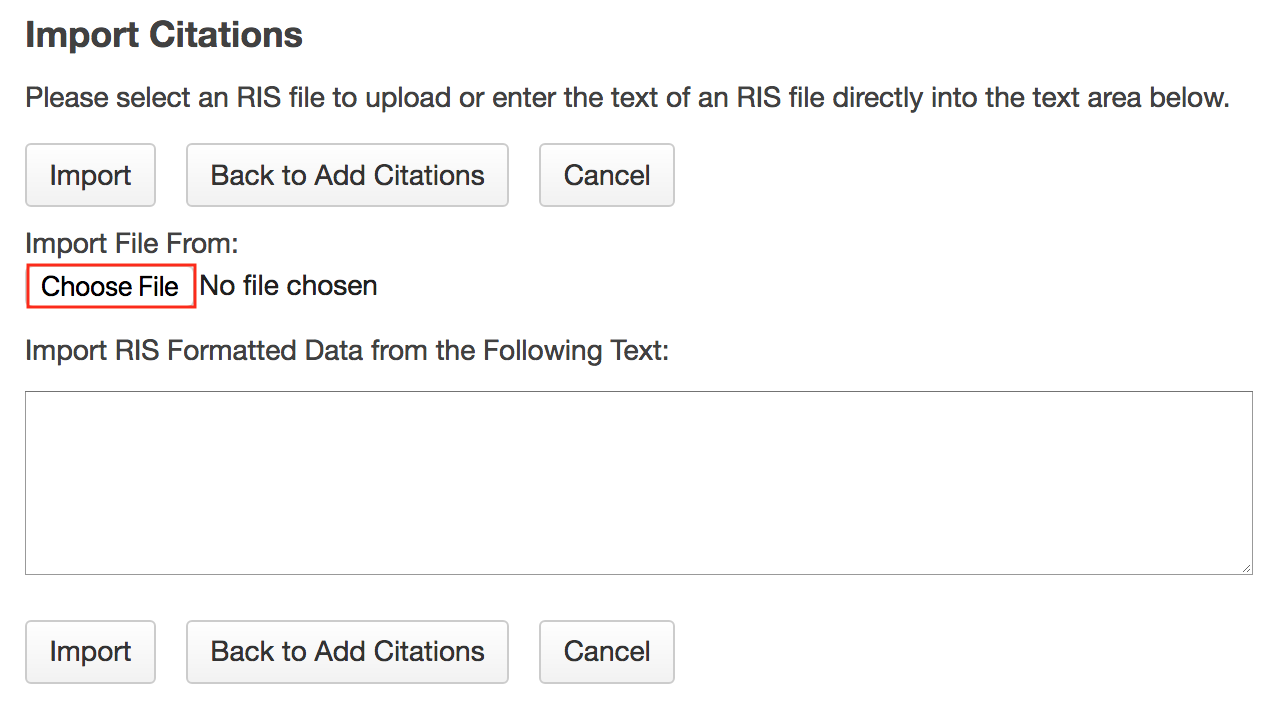
This displays the Import Citations page.
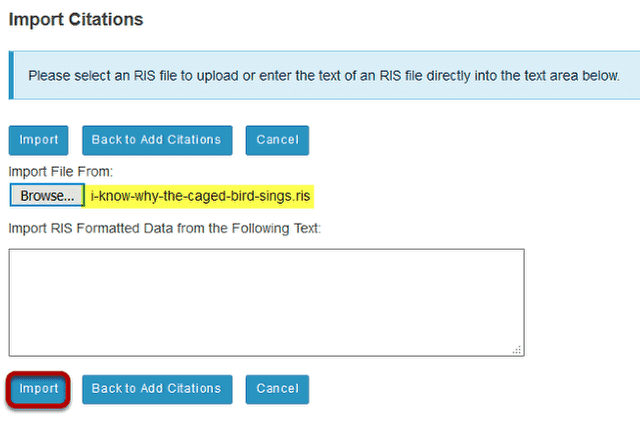
Click Choose File to locate and select the .ris file on your computer.
Note: The selected .ris filename will appear next to the Browse button.
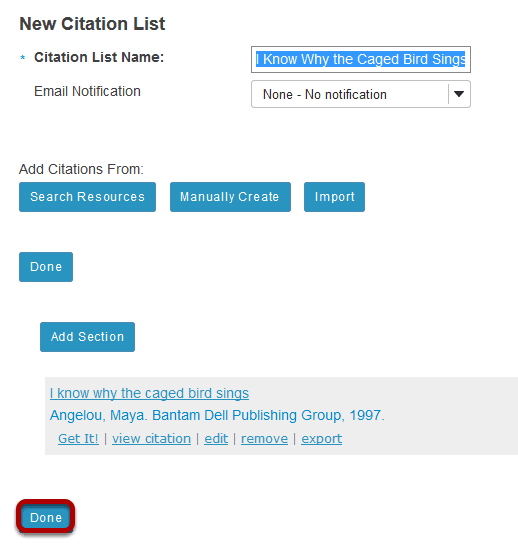
The citation list is located in the selected folder.
Clicking on the list name will open the item and display the list of citations.
Enter a name, then click the Import button.
Click the Browse button.
Click the Import button.
Click the Done button.
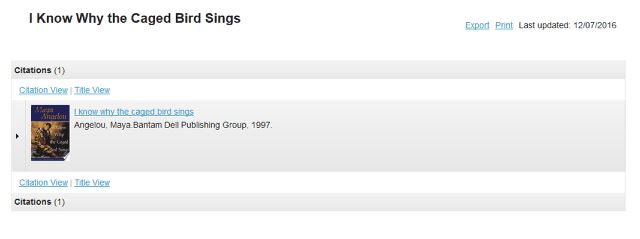
View citation list in Resources.
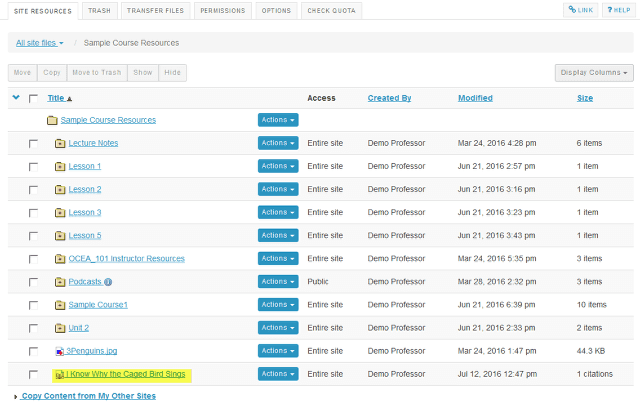
Click on the citation list name.
-
Method 2: Manually create citation list.
To the right of the folder where you want to create the citation list, from the Actions drop-down menu, select Create Citation List.
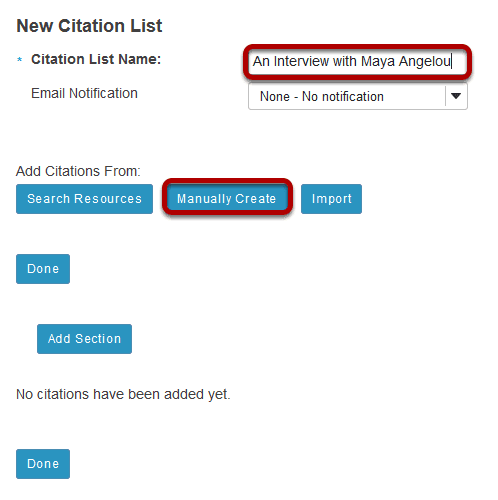
This displays the New Citation List page.
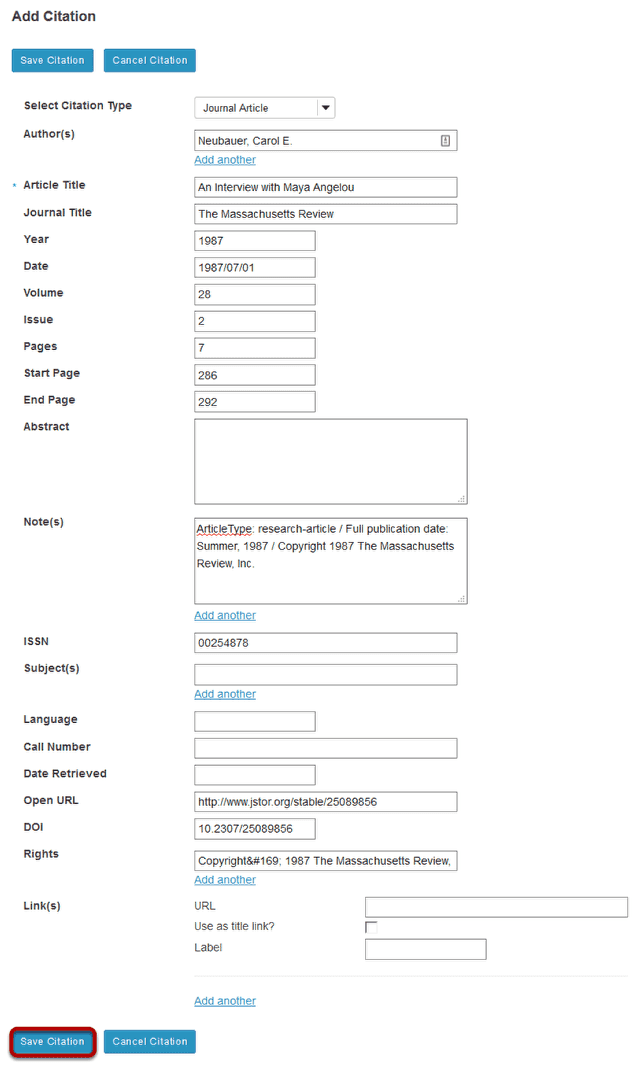
Manually enter the citation information, then click Save Citation.
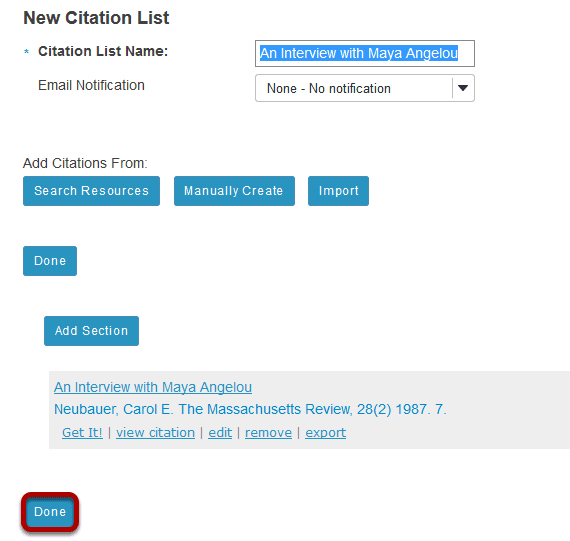
This returns the display to the New Citation List page with a summary of the citation information. You may add more citations if needed. When finished, click Done.
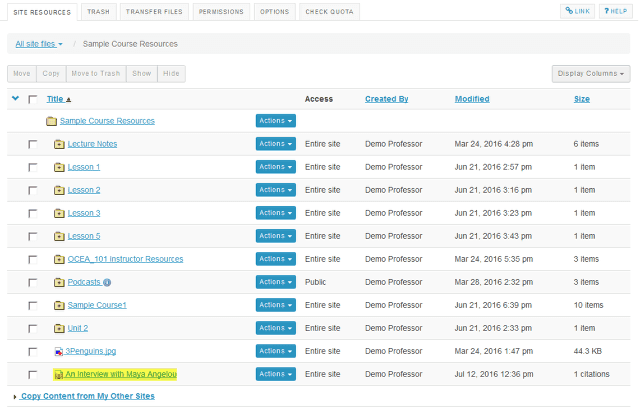
The citation is listed in the selected folder.
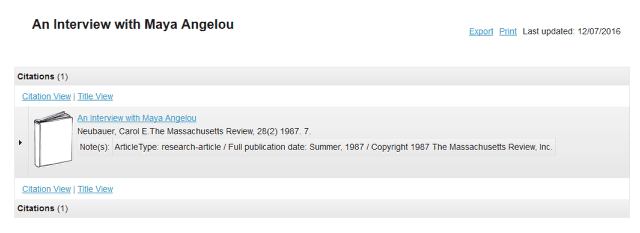
Clicking on the list name will open the item and display the list of citations.
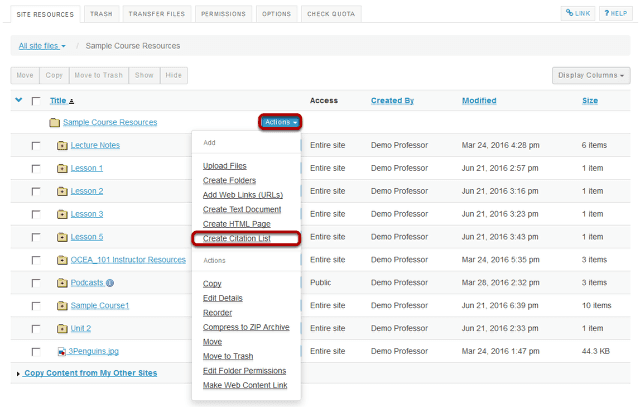
Enter a name for the citation list, then click Manually Create button.
Enter citation information, then click Save Citation button.
Click the Done button.
View citation list in Resources.
Click on the citation list name.
How do I notify site participants that content has been added to Resources?
Site owners can automatically notify participants via the Notifications feature that an item has been added to Resources. When used, site members receive an email containing details of the file or link that has been added to Resources.
-
Select the Resources tool from the Tool Menu in the site.

-
Add a content item.
See any of the following articles for more information on adding items to Resources:
-
When adding an item, select High or Low notification.
Notes:

