Add Content
On This Page
Add Text
-
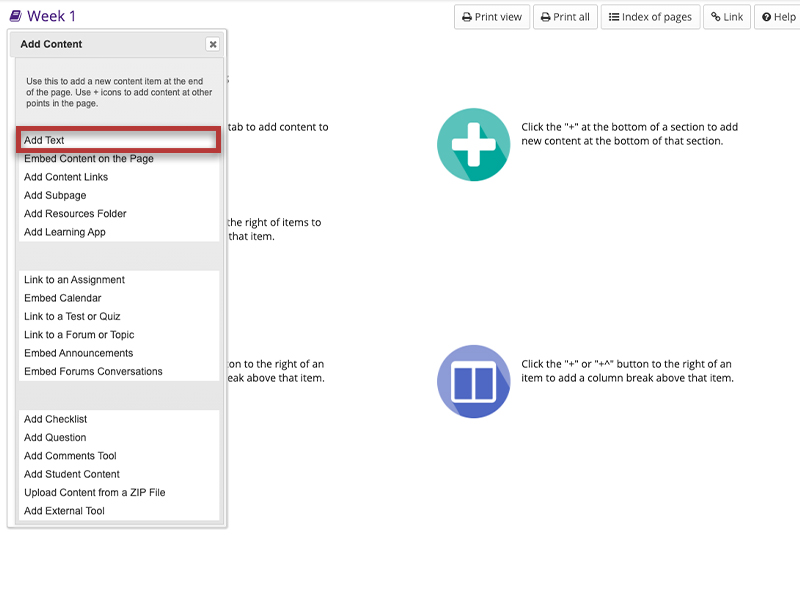
From the Add Content dropdown menu, select Add Text.
You may also add content by clicking on the + button next to any existing item on the page.
-
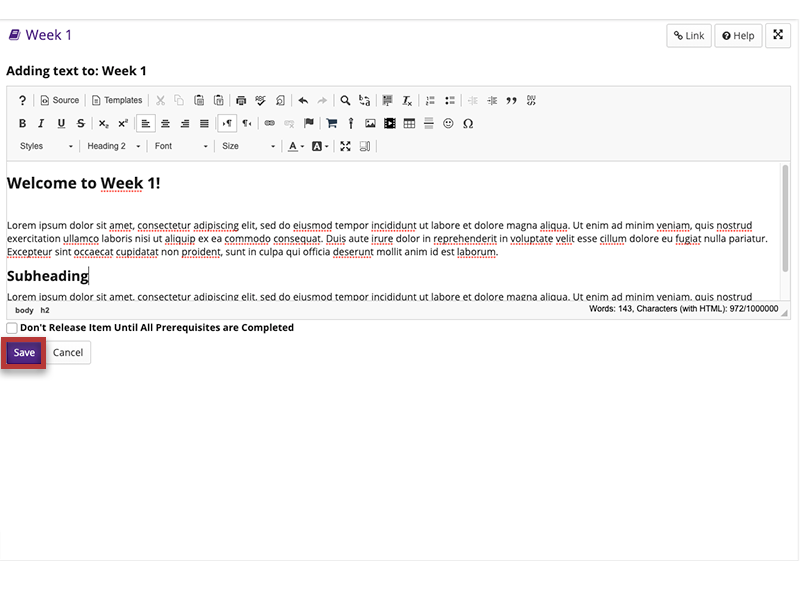
Enter your text content.
Use the Rich Text Editor tools to format the text. Weblinks, images, and other media can also be embedded within the Text Editor.
When finished, click the Save button.
Add Content Links
Instructors can add links to files and external websites on a Lessons page.
-
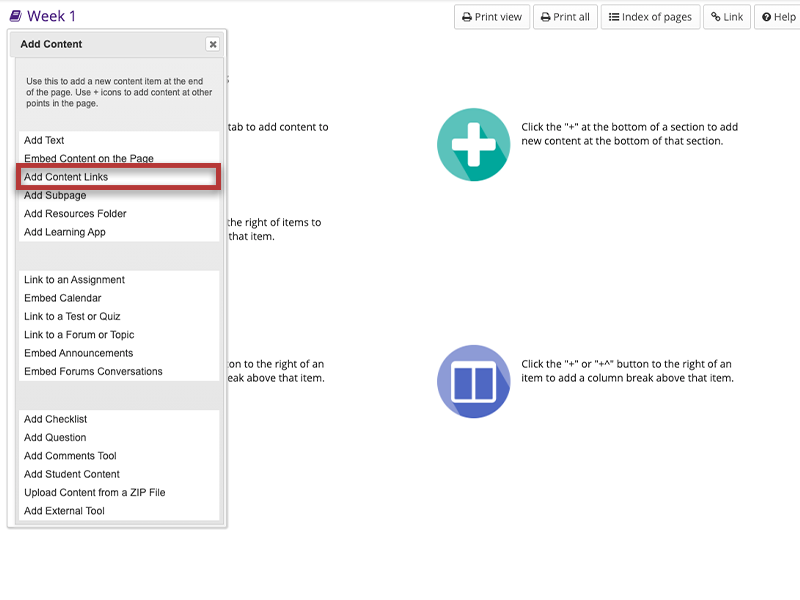
From the Add Content drop-down menu, select Add Content Link.
You may also add content by clicking on the + button next to any existing item on the page.
-
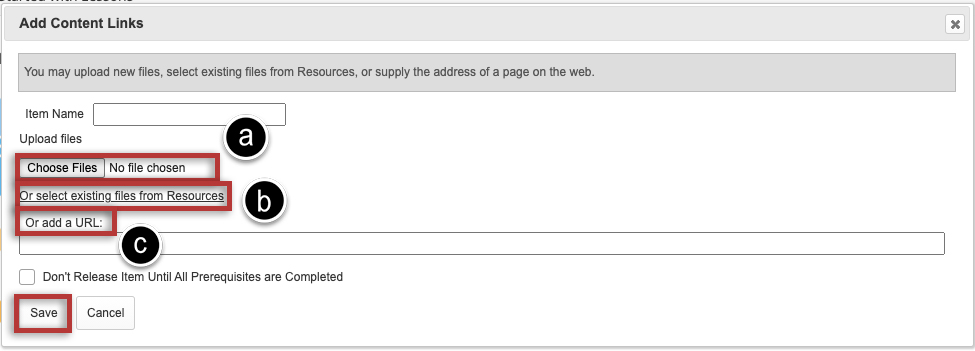
Add your content through:
Click the Save button.
-
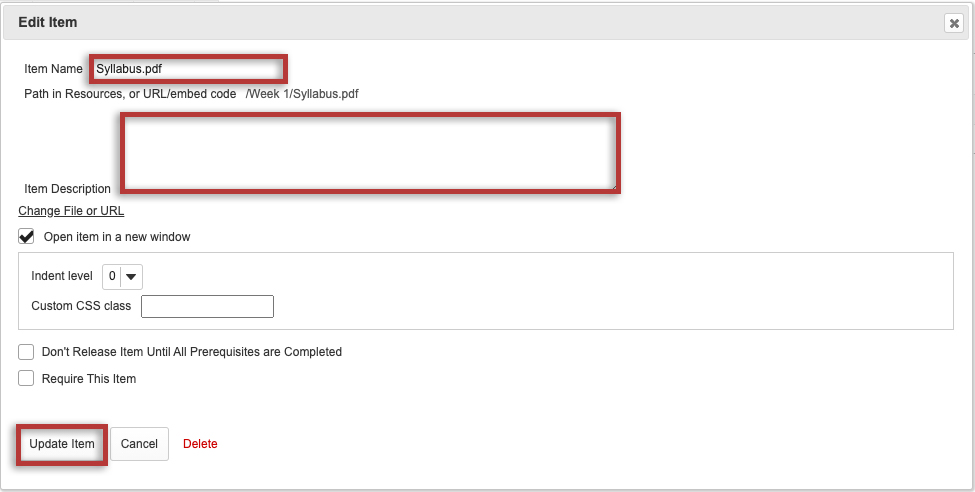
To edit the settings (optional):
Click the Edit icon.
Add/edit the Item Name, add a description, alter the release permissions, then click the Update Item button.
Embed Images
-
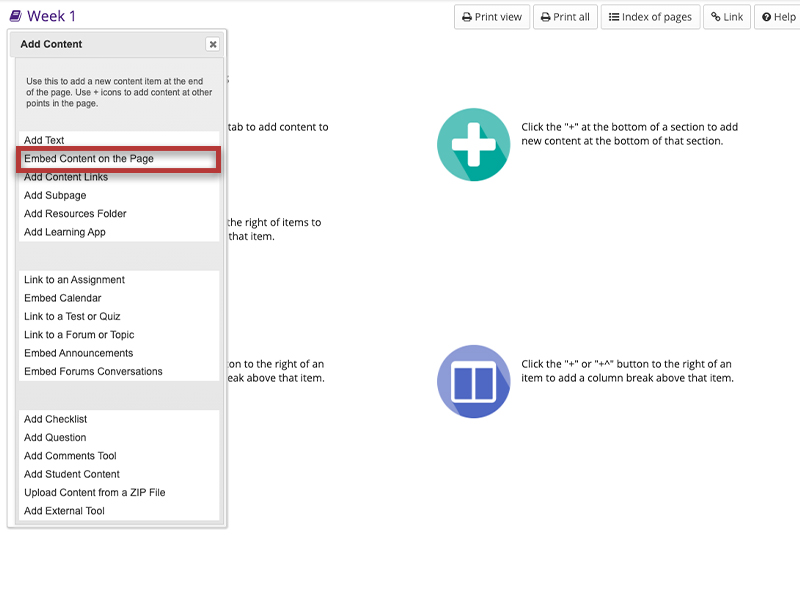
From the Add Content drop-down menu, select Embed Content on the Page.
You may also add content by clicking on the + button next to any existing item on the page.
-
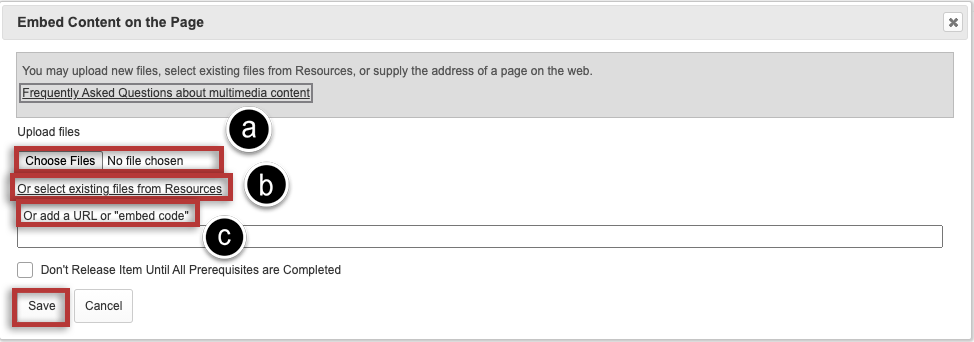
Choose a method to upload the image:
Click the Save button.
-
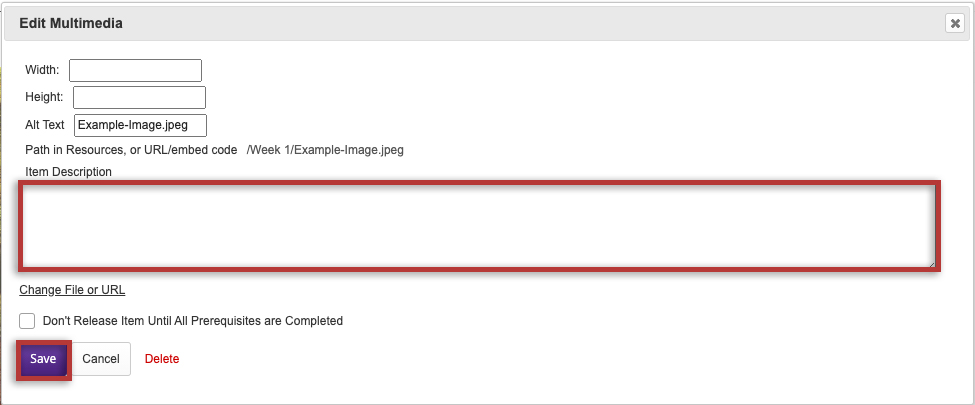
To edit the settings (optional):
Click on the Edit icon.
Enter a description in the Item Description text box and then click the Save button.
Note: the image file was automatically uploaded to your Resources in a folder with the same name as the Lessons page
Embed Youtube Video
If you wish to embed a video file into Lessons from your computer, please see Rich Text Editor > Insert Media.
If you wish to link a video into Lessons from VoiceThread, please see VoiceThread > Creating Multiple Instances of VoiceThread.
Note: The Youtube video must have the embedding enabled in order for it to be embedded within OWL.
-
Locate and copy the Youtube URL.

-
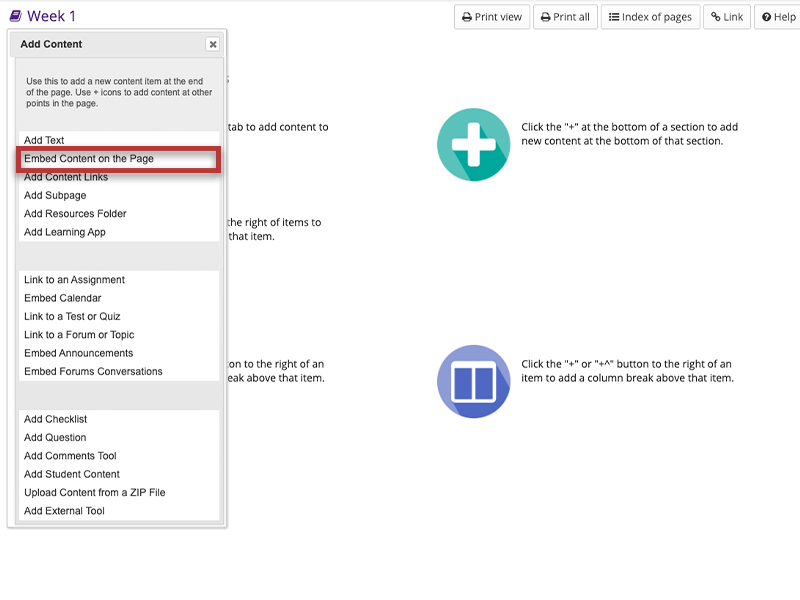
From the Add Content drop-down menu, select Embed content on page.
You may also add content by clicking on the + button next to any existing item on the page.
-
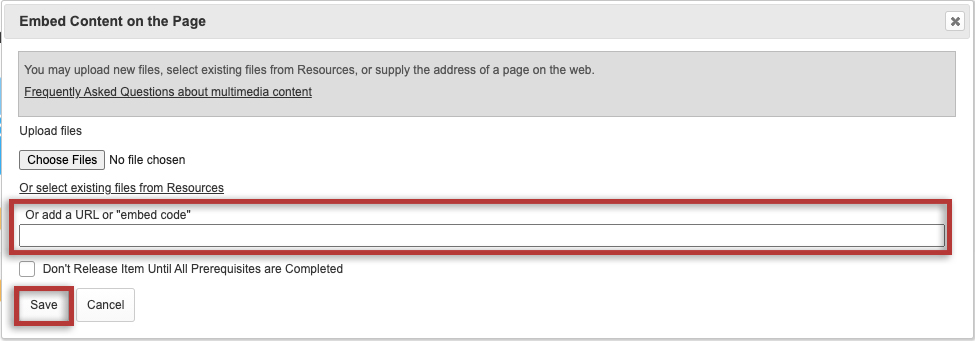
Paste the URL into the text field marked add a URL or "embed code".
Tip: Before clicking Save, you might need to change "http" to "https" as some browsers (e.g. Firefox) do not display "http" links.
Click the Save button.
-
To edit the settings (optional):
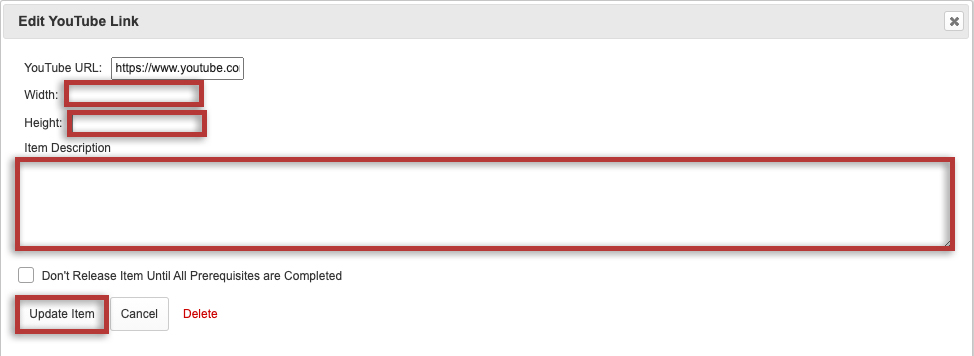
Click on the Edit icon.
Enter the desired Width and Height for your video in number of pixels or percent of screen, and/or enter a description in the Item Description text box.
Click the Update item button to save your changes.
Embed Microsoft Stream Videos
-
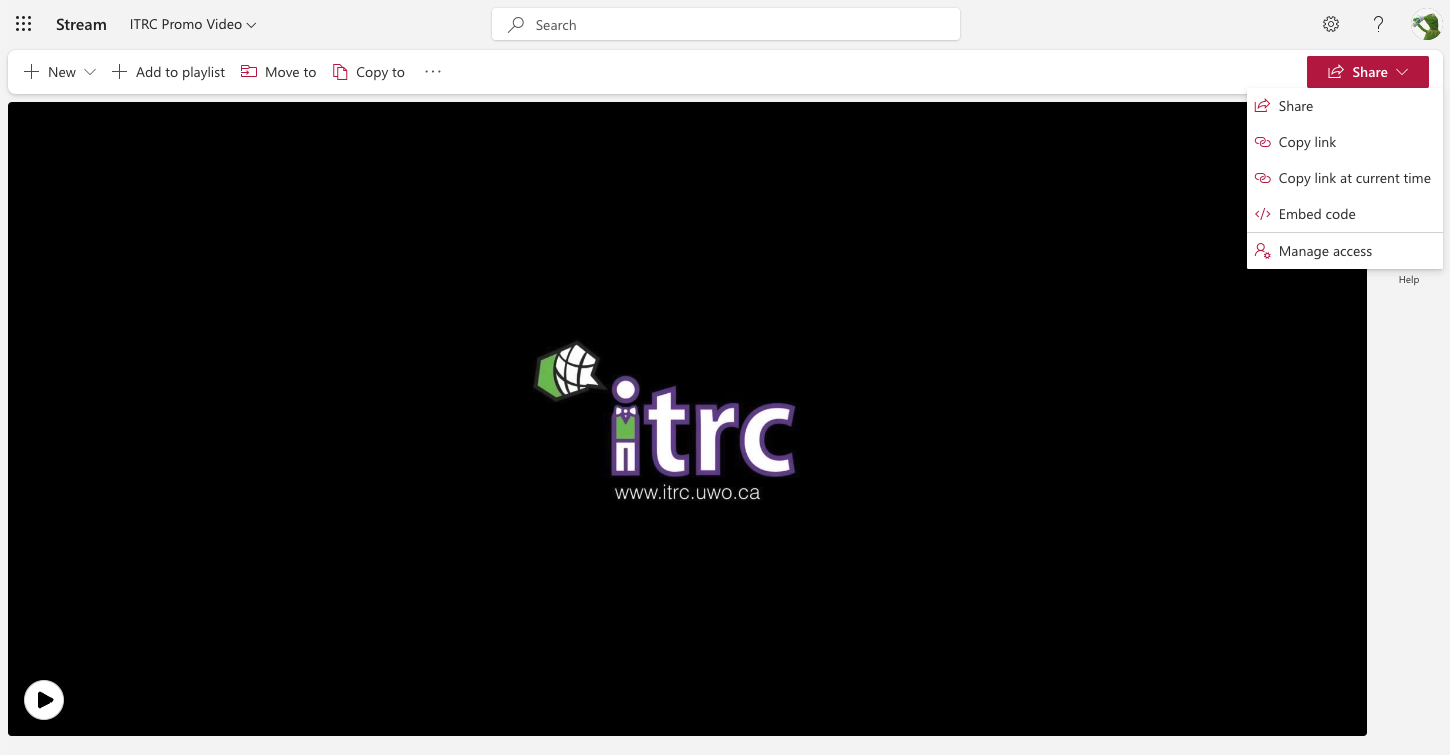
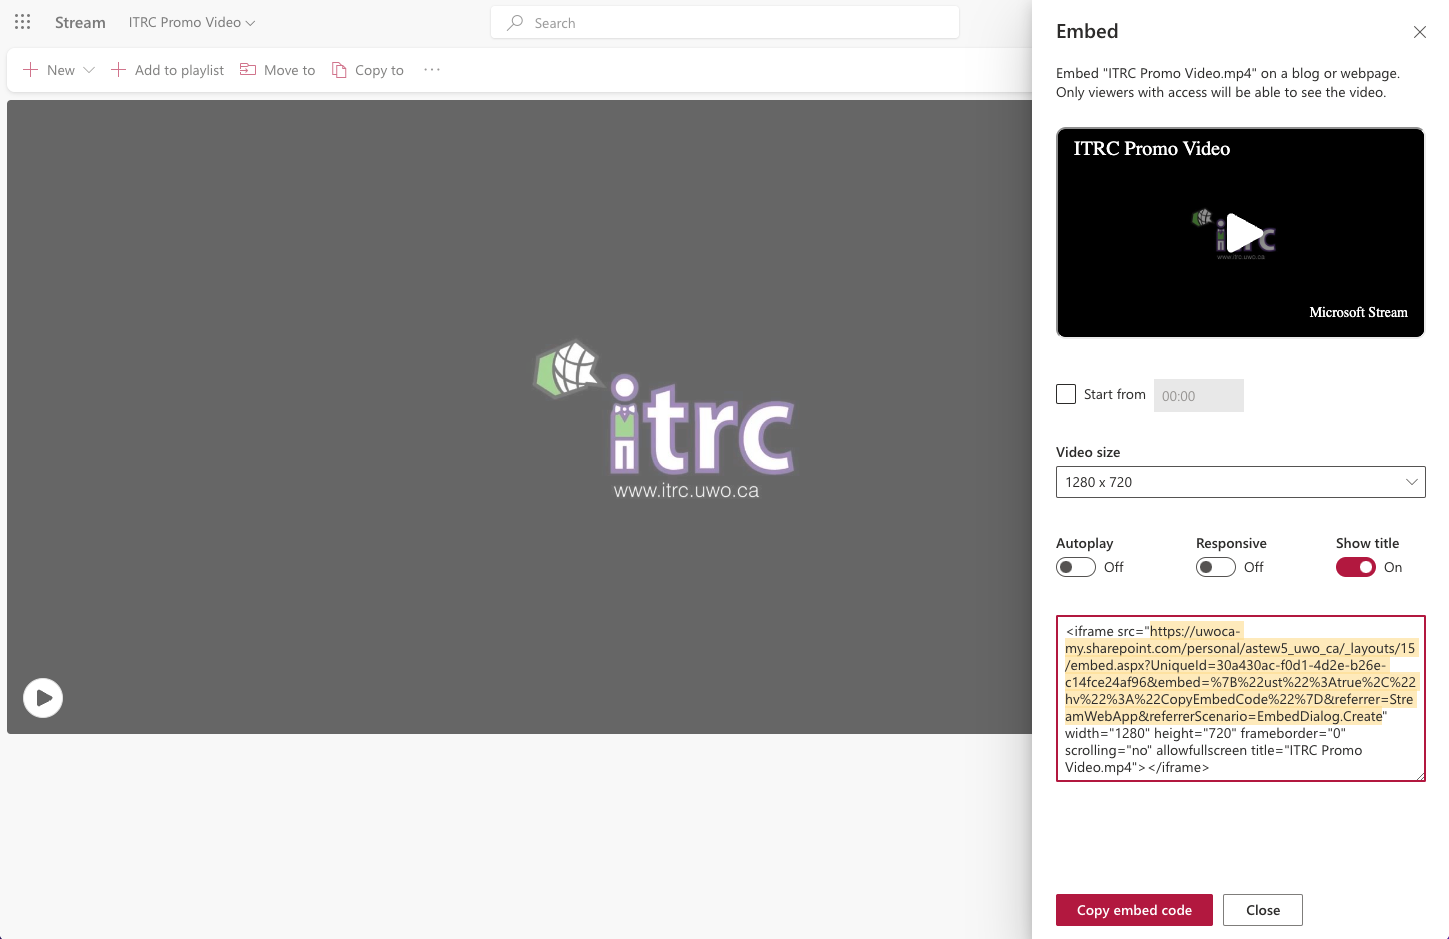
Open the Microsoft Stream video you want to embed in OWL and click the Share button in the top right.
-
Select Embed code, and adjust the player and playback settings as needed.
In the text box containing the embed code, select only the source URL (between the quotation marks).
-
Copy the selected text (right click, select copy or CTRL/CMD + c).
-
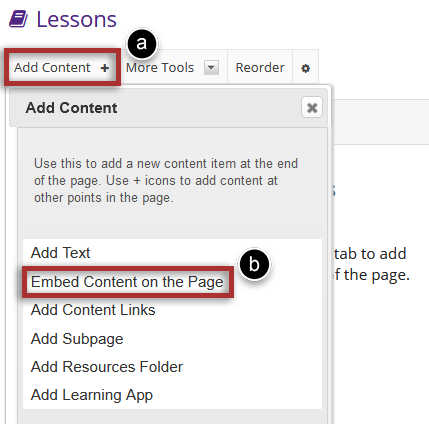
In your OWL Lessons page, select the Add Content drop-down menu.
Select Embed Content on the Page.
Note: You may also add content by clicking on the + button next to any existing item on the page. (Step 2 from Video embed)
-
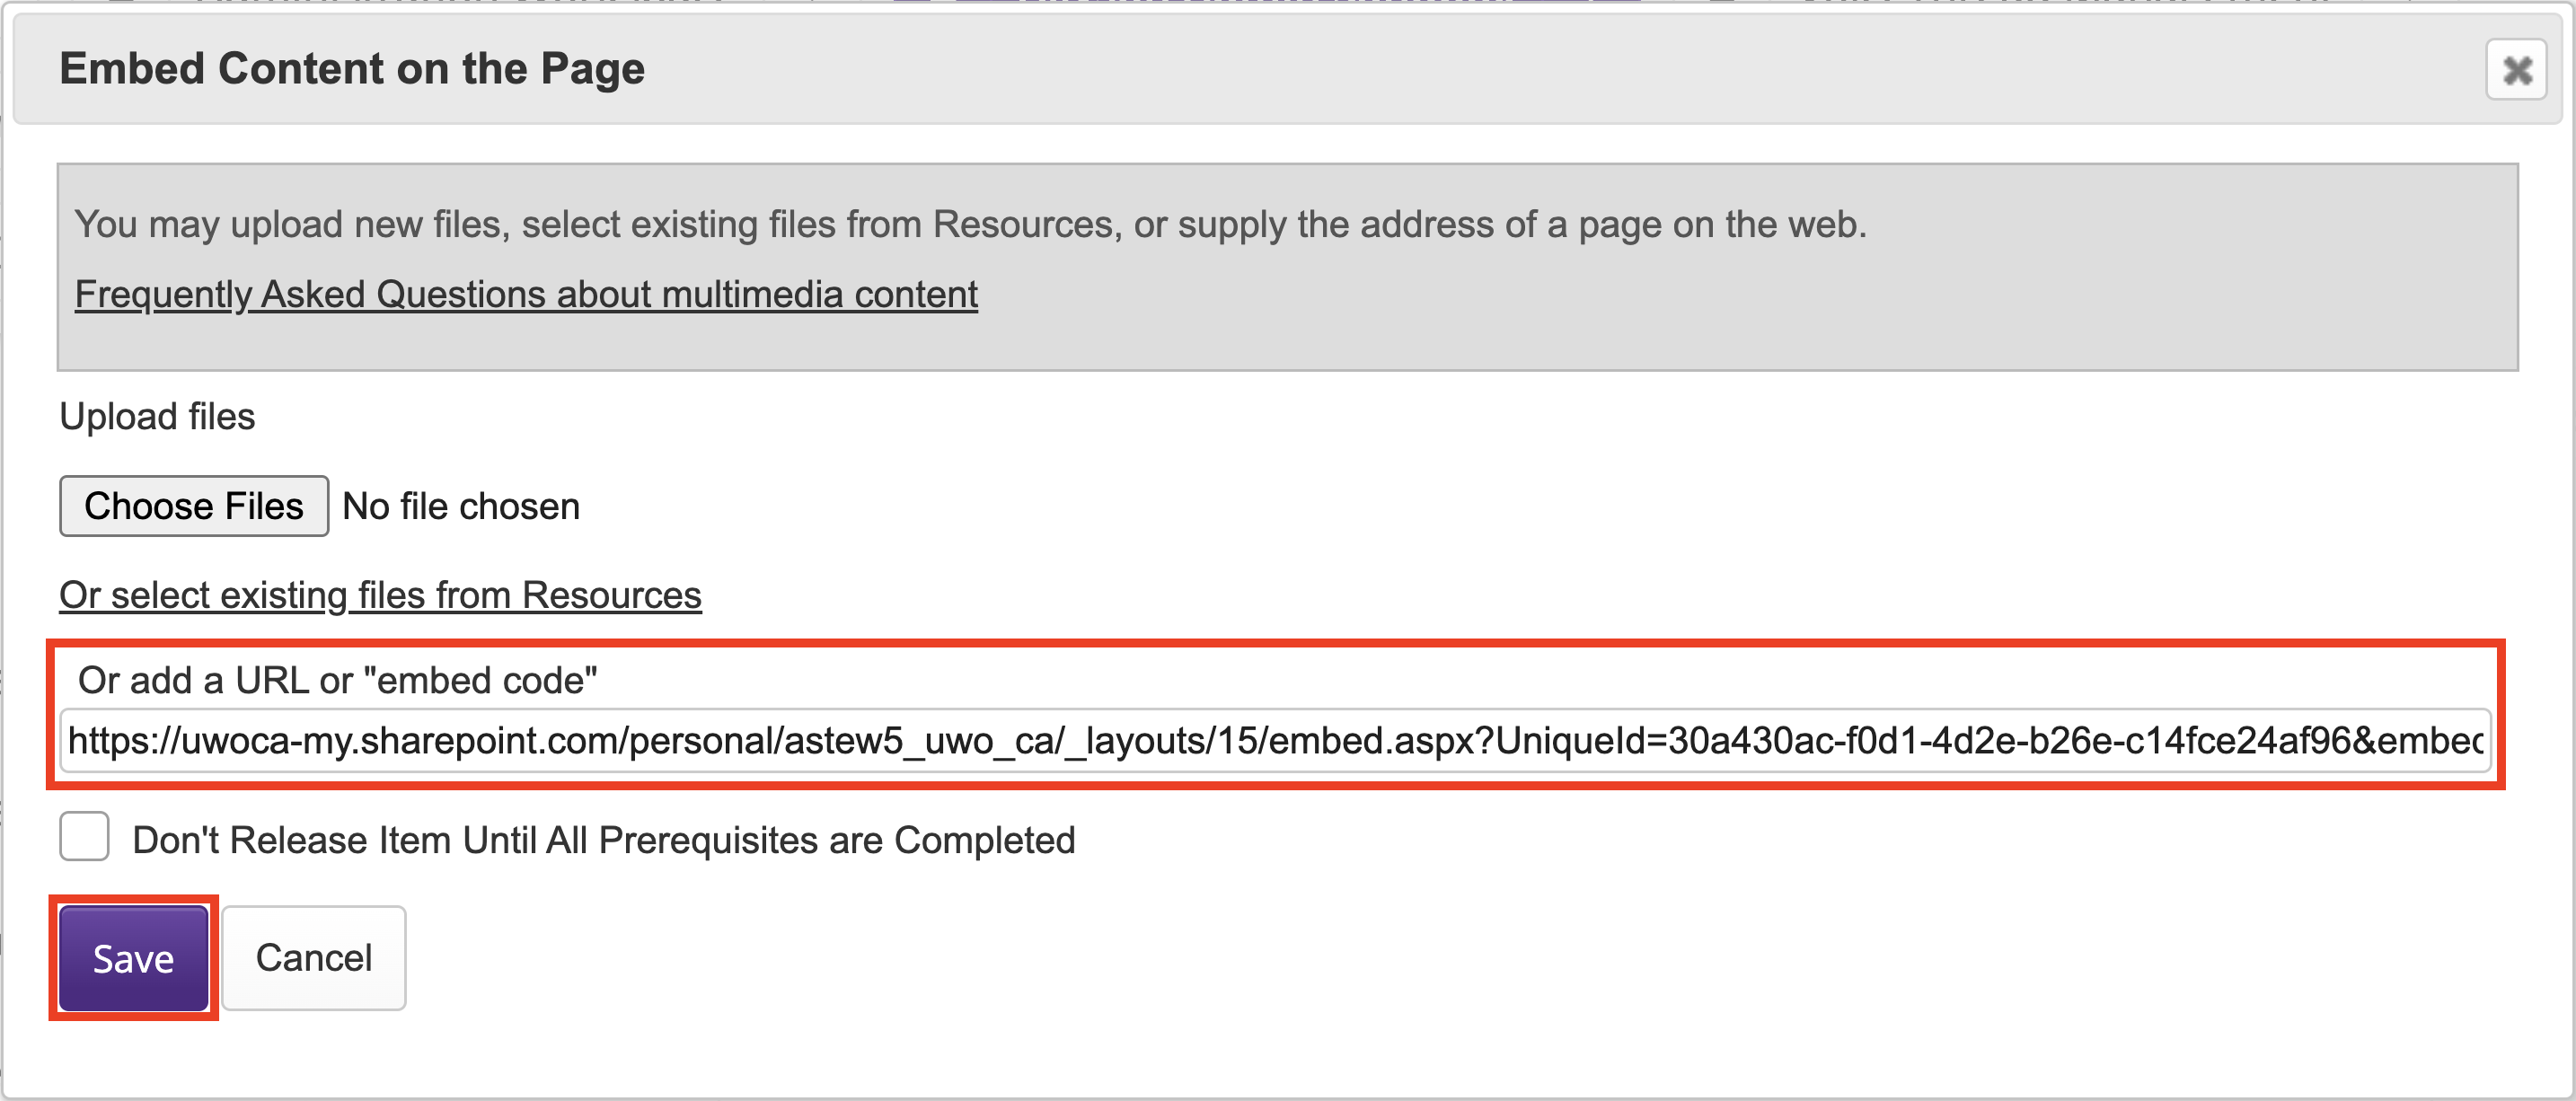
Paste the source URL into the text field marked add a URL or "embed code" (Step 3 from video embed).
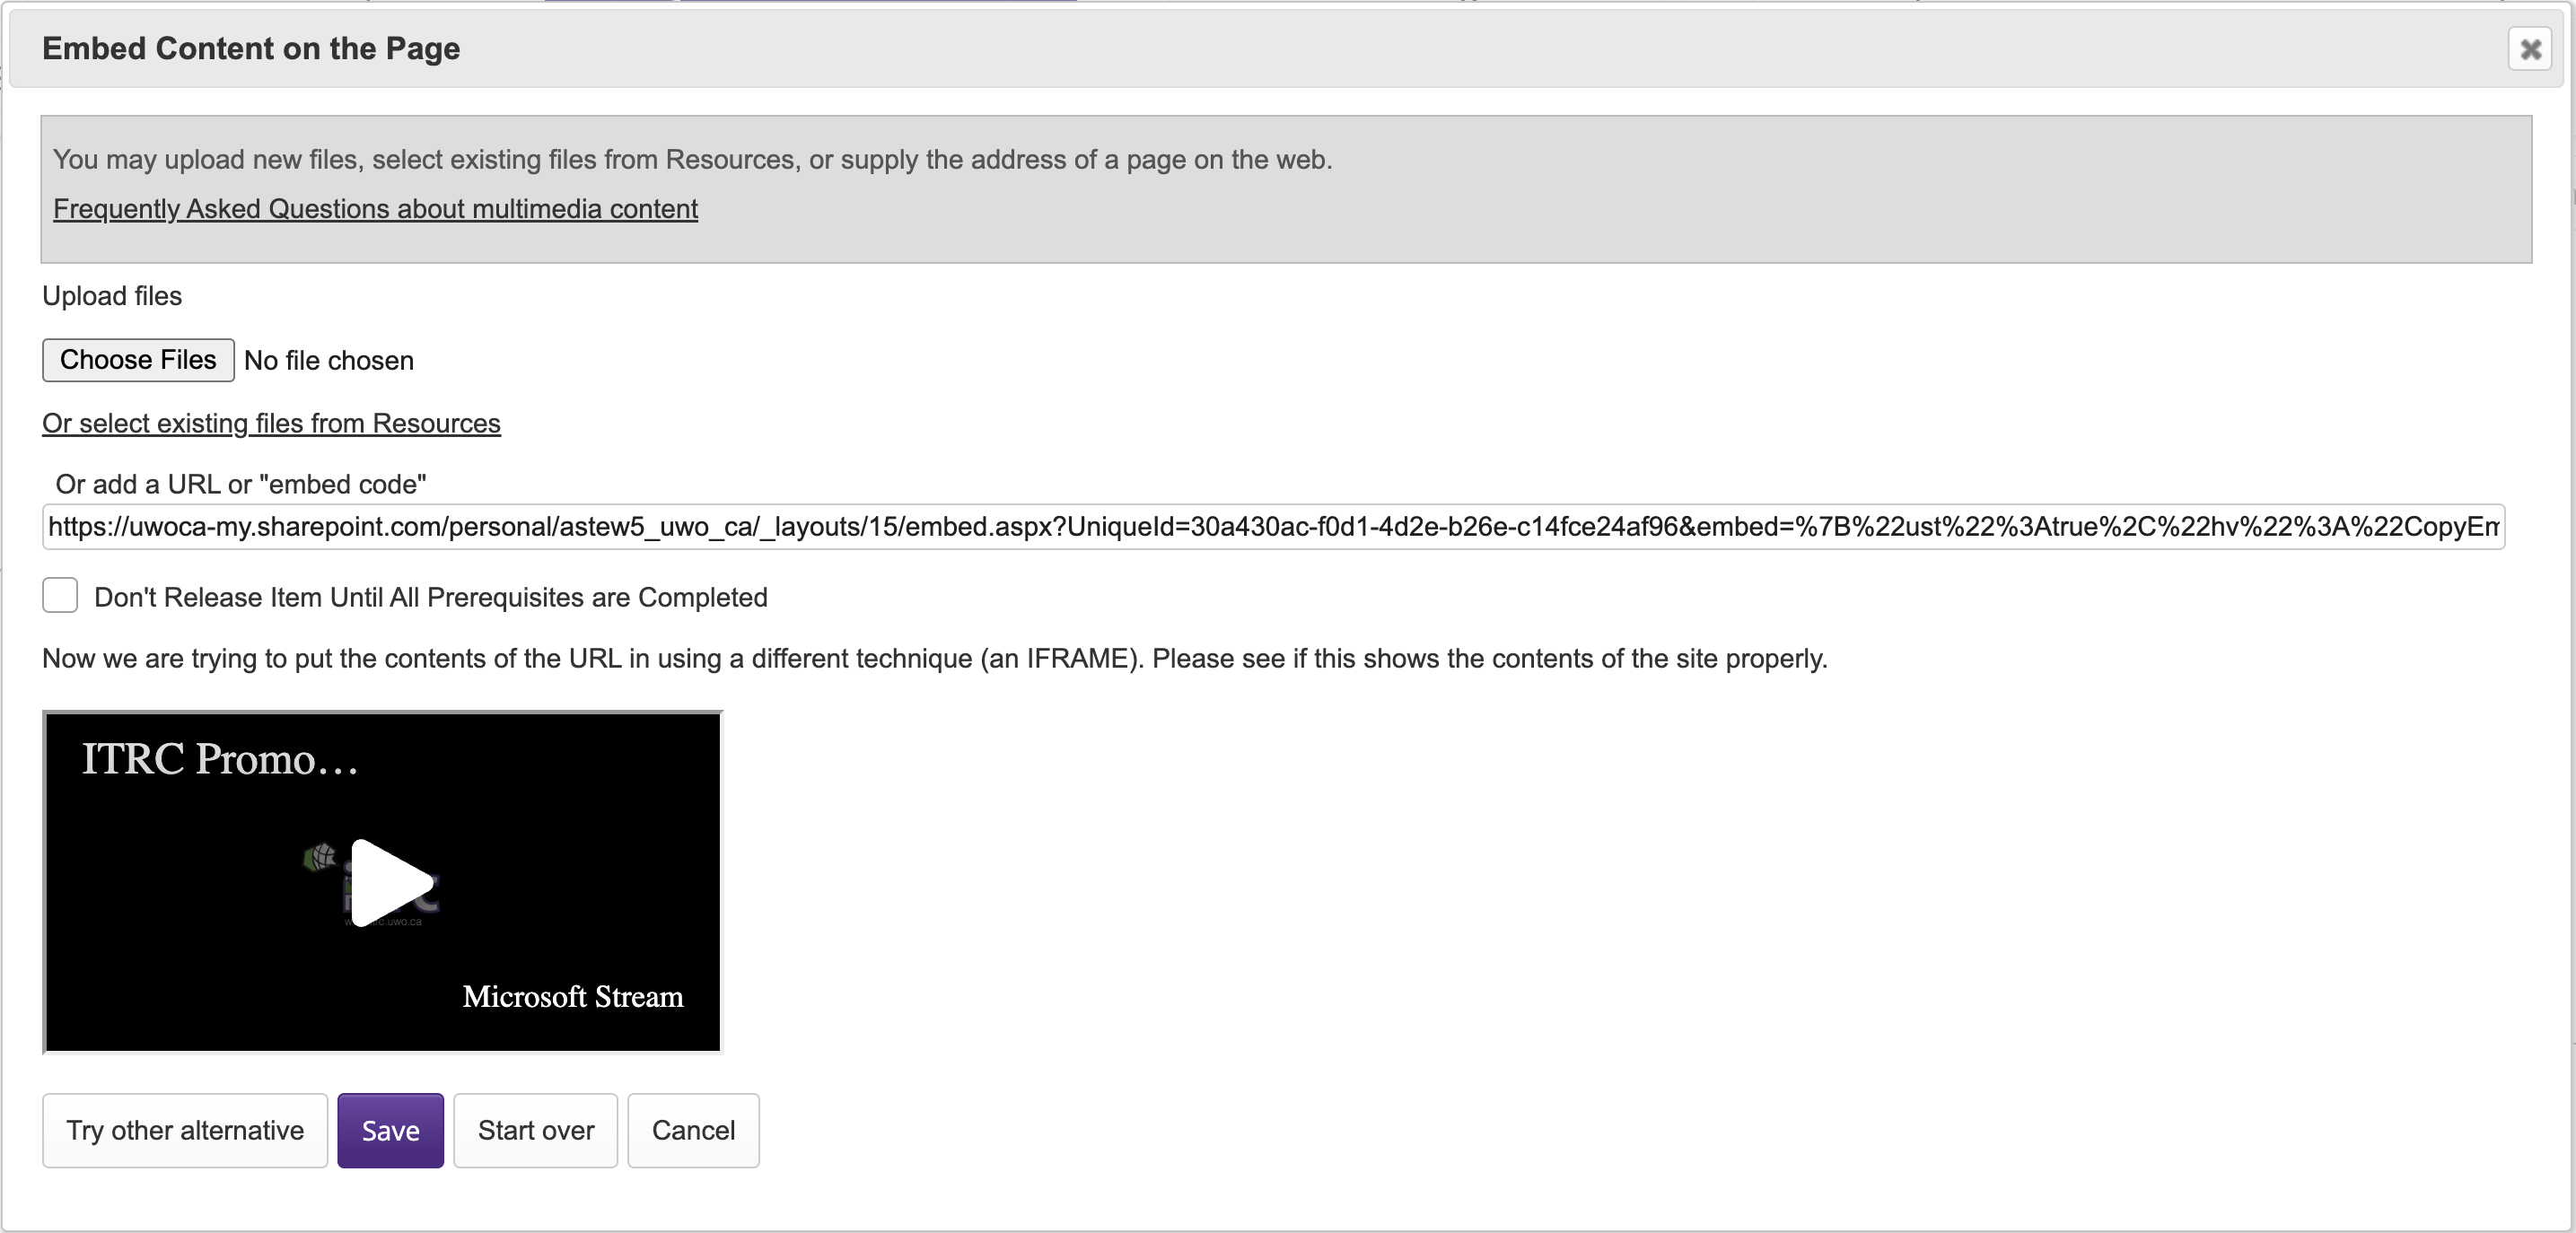
Click the Save button. Then, when prompted click the Try Other Alternative button.
-
View the preview of your embedded video and click the Save button.
Embed Audio
-
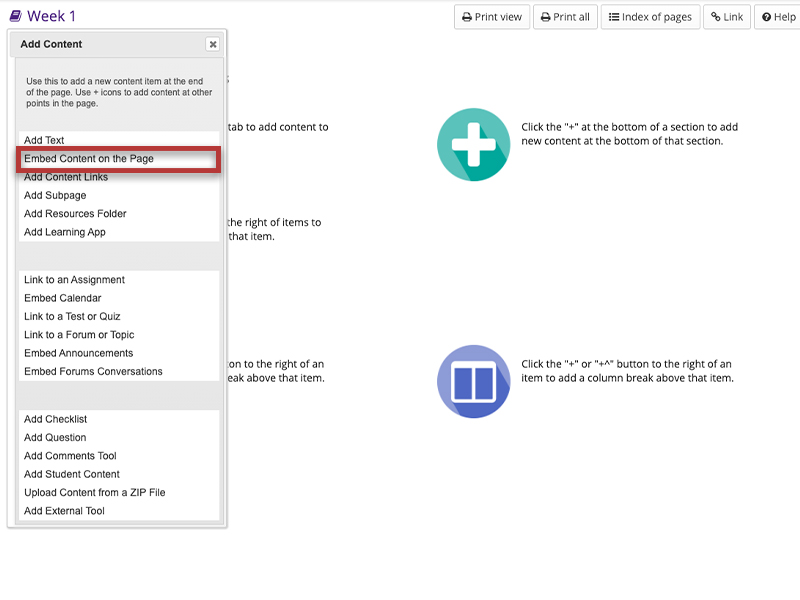
From the Add Content drop-down menu, select Embed content on page.
You may also add content by clicking on the +button next to any existing item on the page.
-
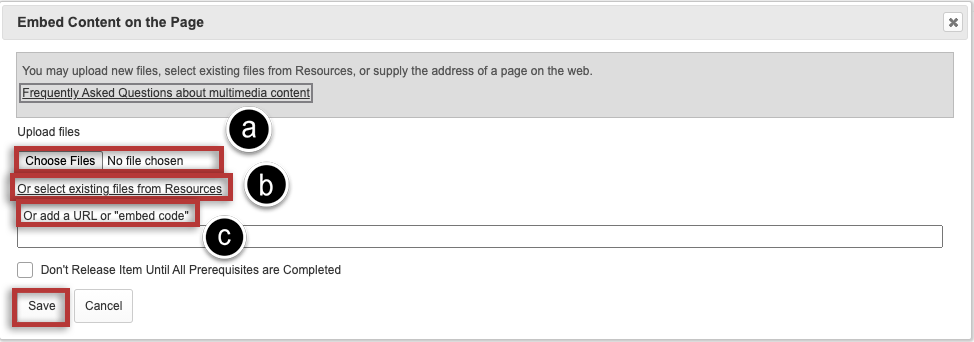
Choose an upload method:
Click the Save button.
-
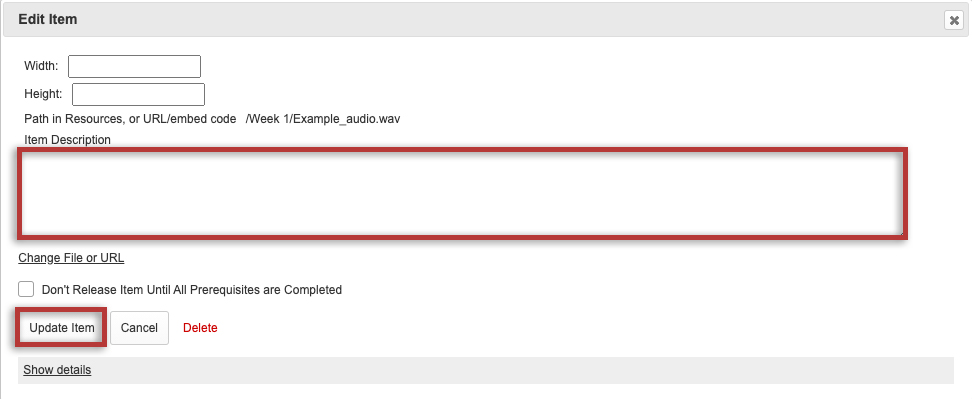
To edit the settings (optional):
Click on the Edit icon.
Add a description of the audio file, then click the Update Item button.
This returns the display to the Lessons page with the embedded audio and its description.
-
Notice the file location in Resources.
Note: The audio file is not streamed to the user. The larger the audio file, the longer it will take for the audio file to load on the Lessons page.

Embed Office 365 Documents
-
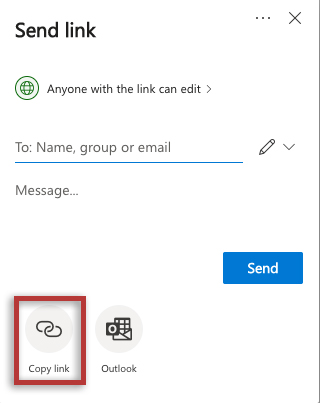
Get a shareable link to your document
e.g. https://uwoca-my.sharepoint.com/:w:/g/personal/USERNAME_
uwo_ca/<FILENAME>Tip: It is best practice to disable editing on embed links to prevent accidental overwrites.
-
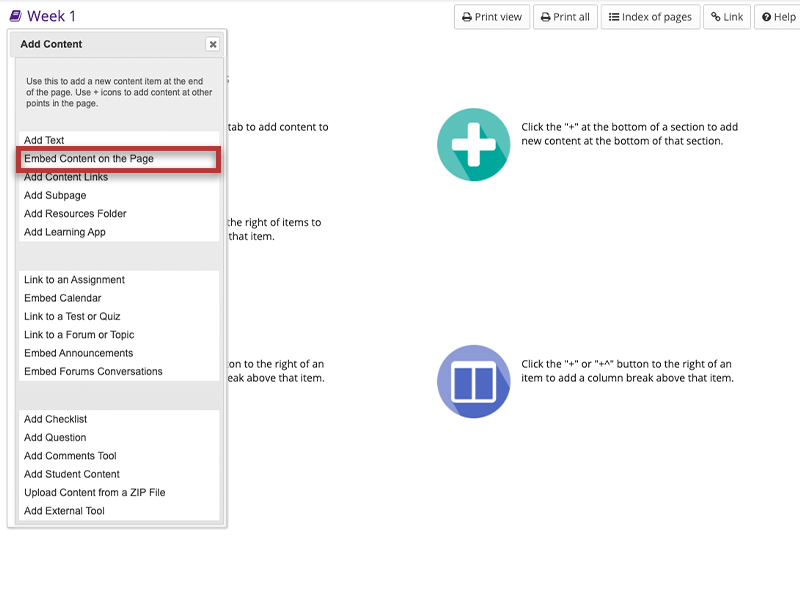
From the Add Content drop-down menu, select Embed content on page.
You may also add content by clicking on the + button next to any existing item on the page. (Step 2 from Video embed)
-
Paste the URL into the text field marked add a URL or "embed code" (Step 3 from video embed)

-
Append &action=embedview to the URL.

Add Comments
Instructors can allow students to add comments to a Lessons page. The comments can either be anonymous or have the student's name attached. The comments can be graded and either required or optional.
Note: Students have 30 minutes to edit or delete their comments. Instructors can edit or delete a student comment at any time.
-
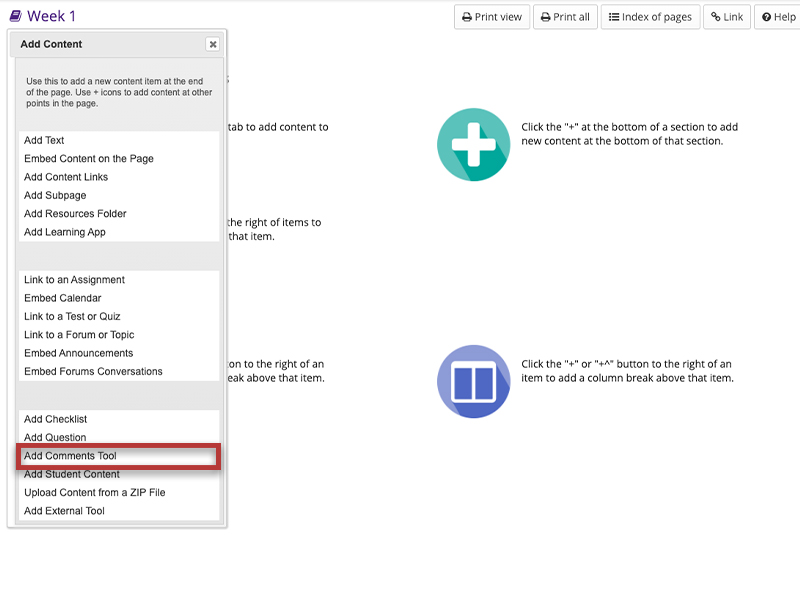
From the Add Content drop-down menu, select Add Comments Tool.
You may also add content by clicking on the + button next to any existing item on the page.
-
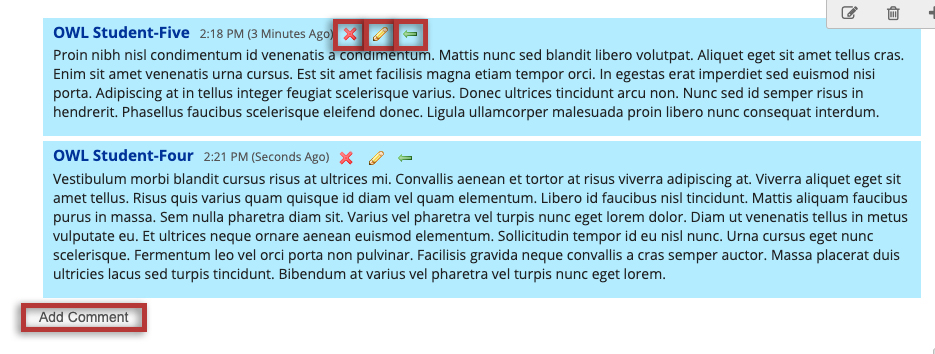
View Comments tool on page.
Note: Students can read other students' comments in this tool.

-
Instructors can delete, edit, and reply to any comment.
-
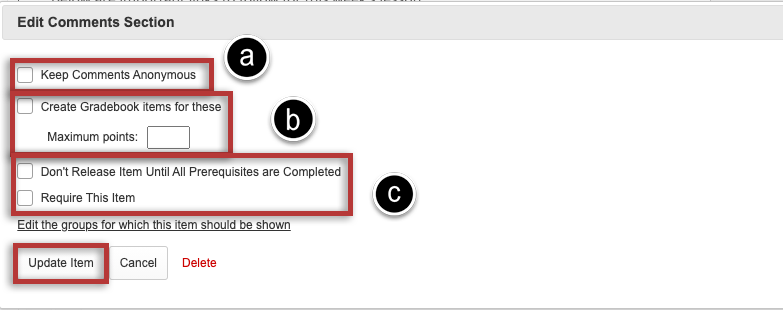
To edit the settings (optional):
Click the Edit icon.
Click the Update Item button.
-
To grade comments:
Grades can be entered on the comments themselves, or click on the Grading Pane icon to enter scores.

Add Student Content
-
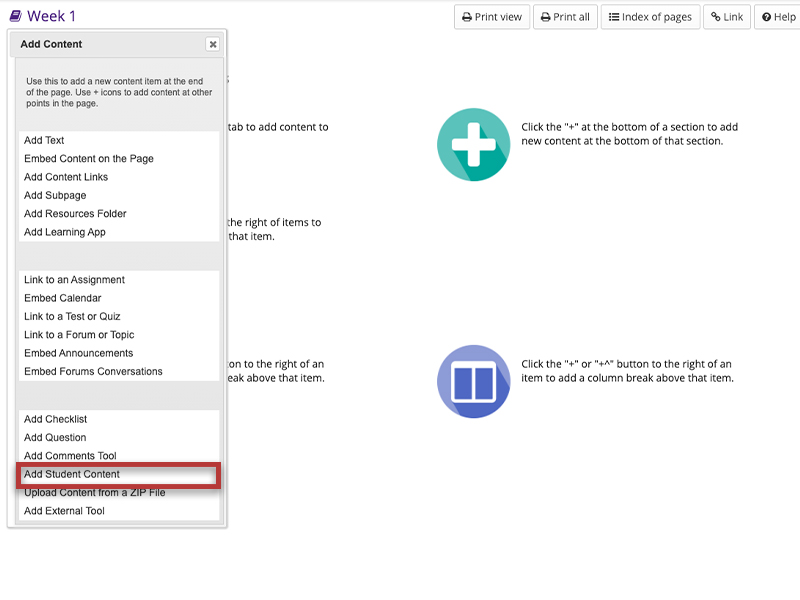
From the Add Content drop-down menu, select Add Student Content.
You may also add content by clicking on the + button next to any existing item on the page.
A list of links to Student Content pages (once students create them) will now be populated on the Lessons page.
-
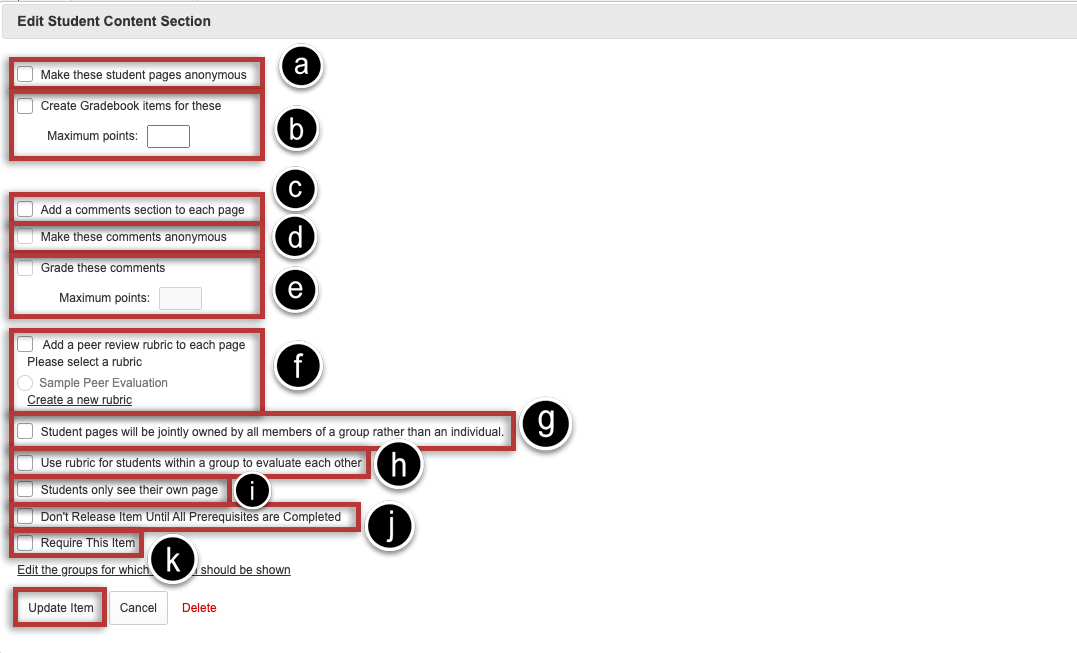
To edit the settings (optional):
Click the Edit icon.
Click Update Item once all changes are complete.
Note: All of the settings listed above are optional.
-
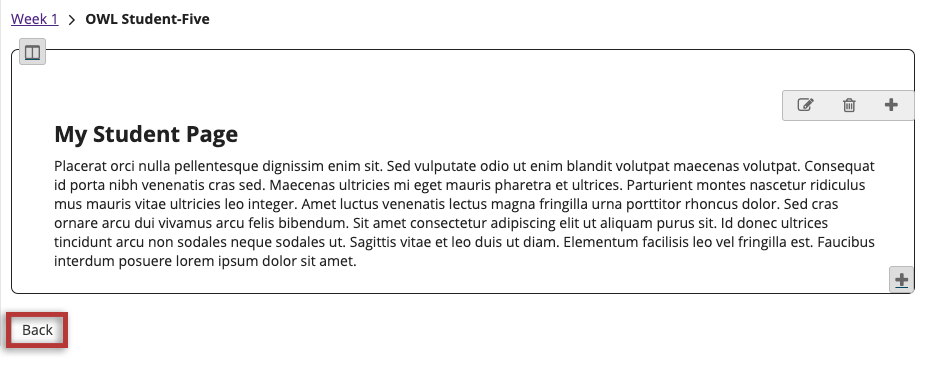
To view a student's page, click on the student's name in the list.
Students can add text, link to documents, link to web pages, embed images, embed video, embed audio, create sub-pages, add comments (if allowed) and peer review (if allowed).
Click Back to return to the main Lessons page. The Back button is located in the bottom left corner of the student's page.

Add Assessment Links
-
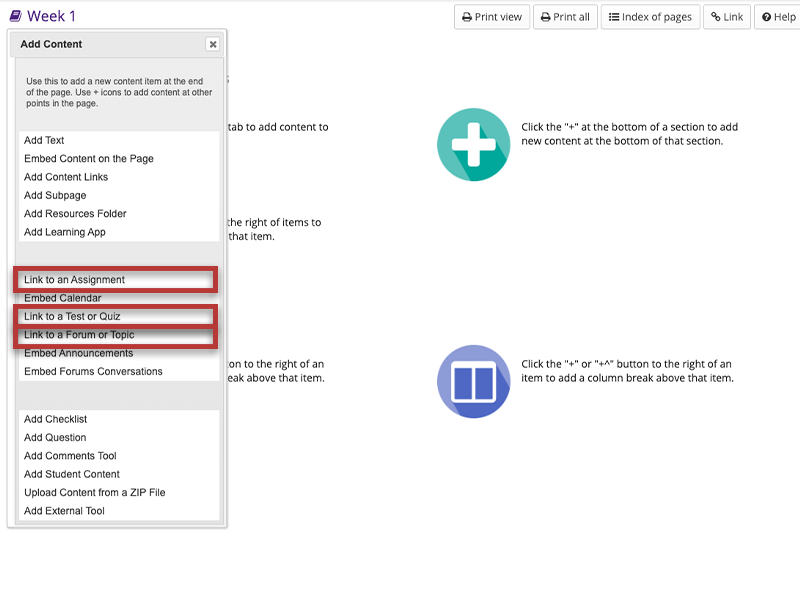
From the Add Content drop-down menu, select either:
You may also add content by clicking on the + button next to any existing item on the page.
-
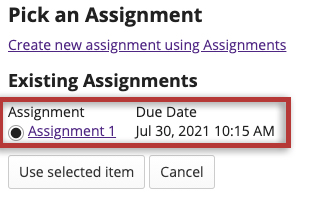
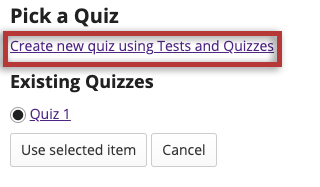
Select from the list of already created assessments or Click the "Create" link to create a new assignment, quiz, or forum.
-
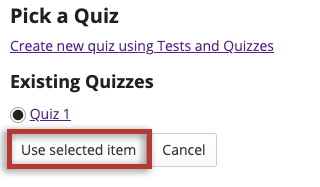
After selecting the Assignment/Forum/Quiz, click Use selected item.
A link to the assessment will now be listed in the Lessons page.
Add Questions
-
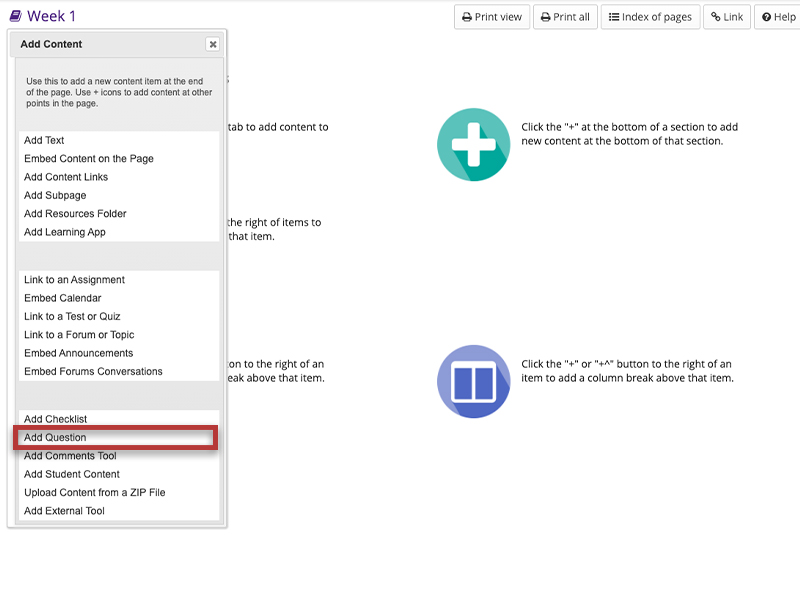
Click Add Content from the top menu, then click Add Question.
-
For a Multiple Choice question
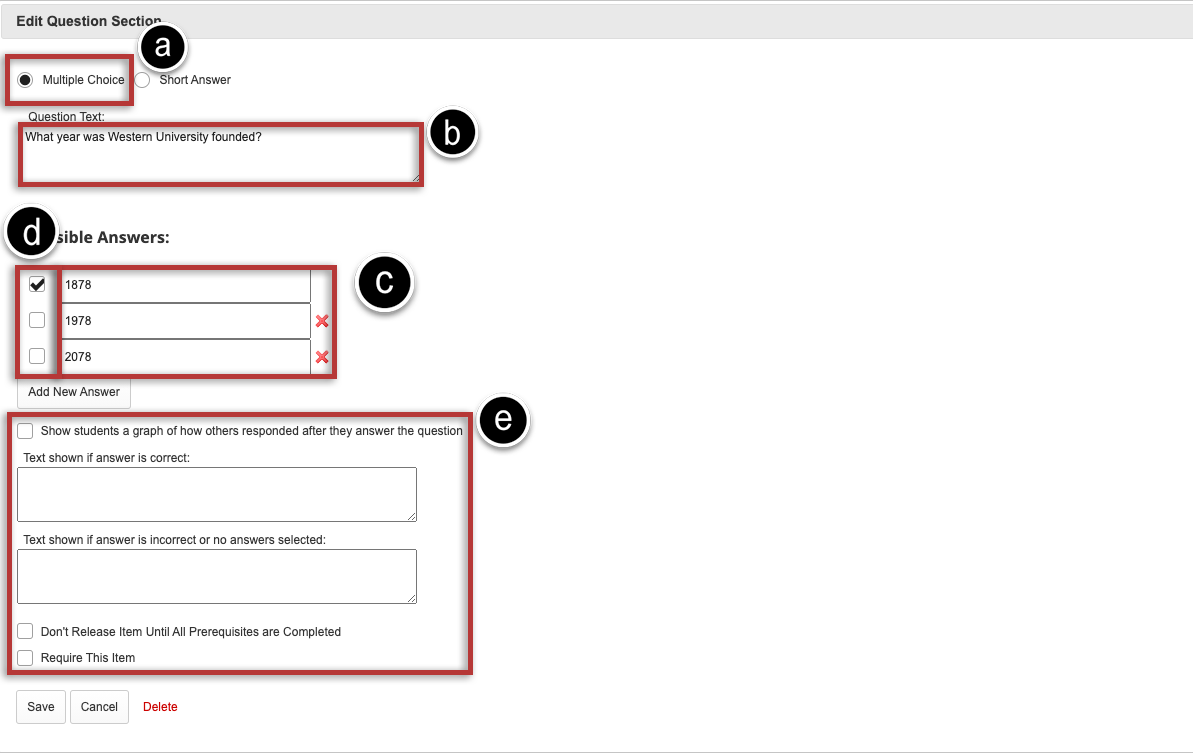
-
For a Short Answer question
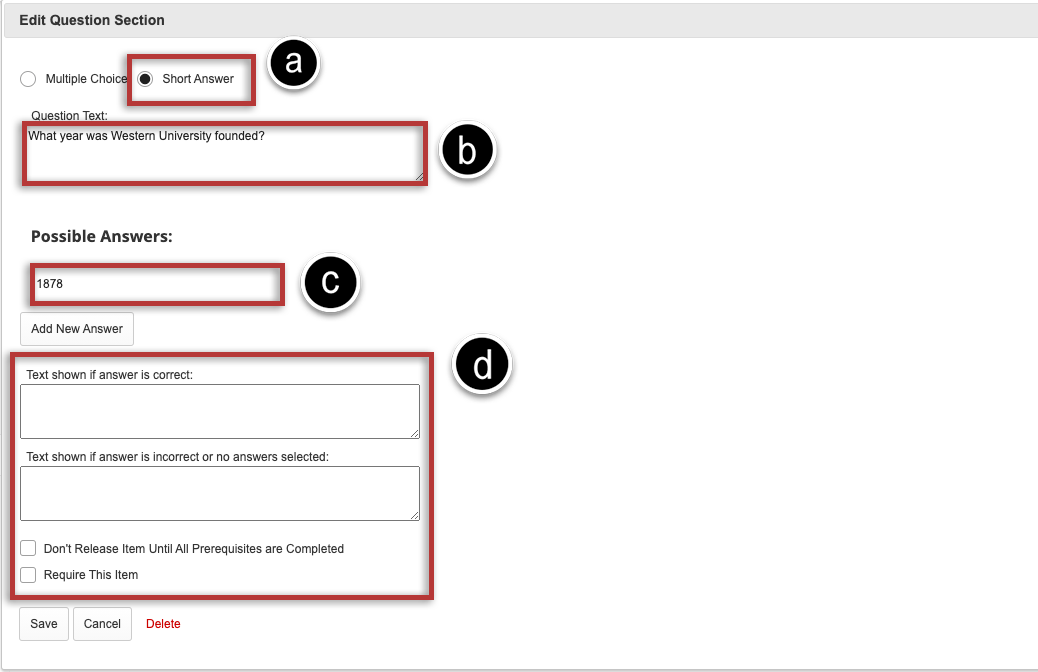
-
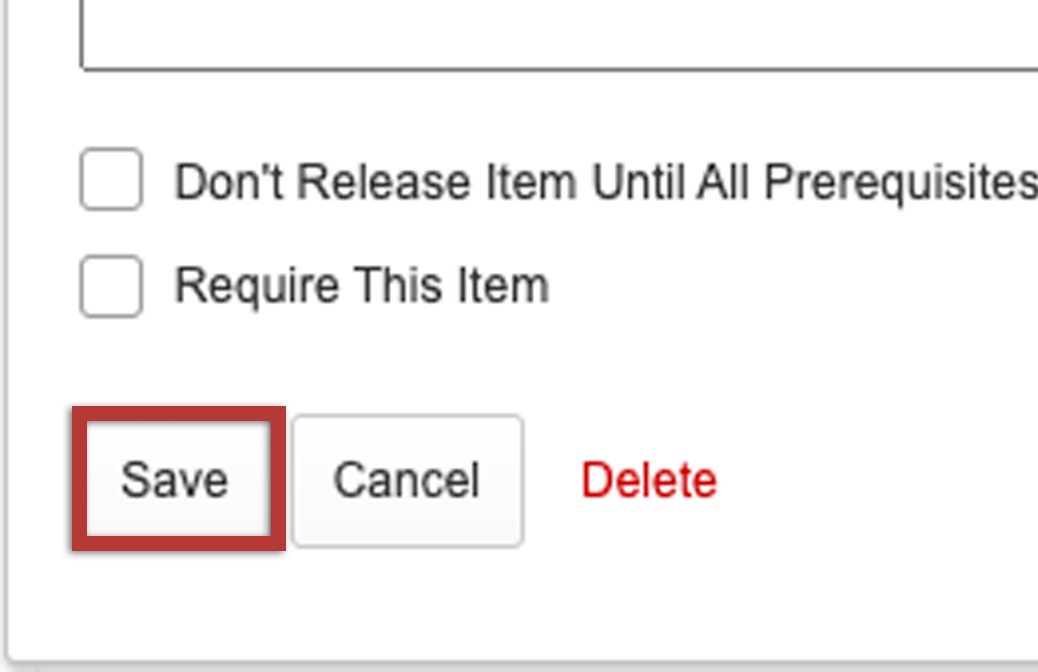
Click the Save button.
Your question will now be displayed in the Lessons page.
Add Checklist
-
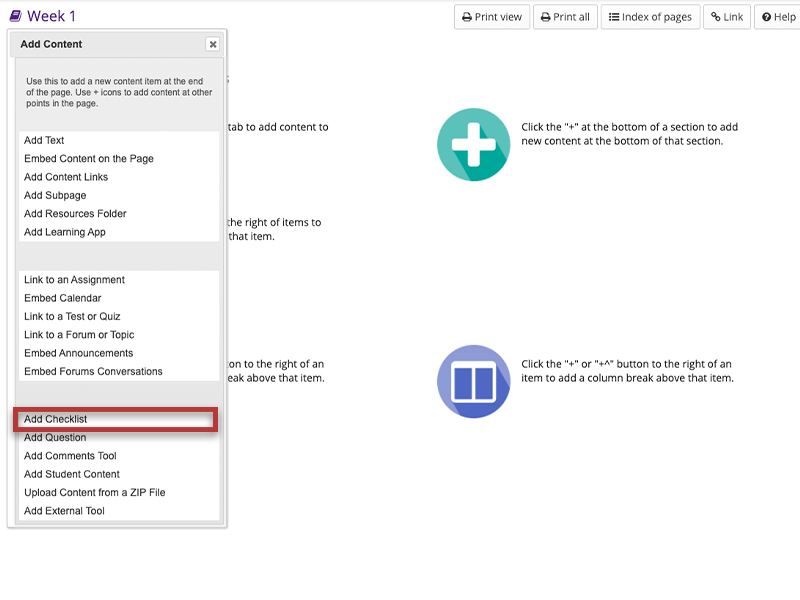
From the Add Content drop-down menu, select Add Checklist.
You may also add content by clicking on the + button next to any existing item on the page.
-
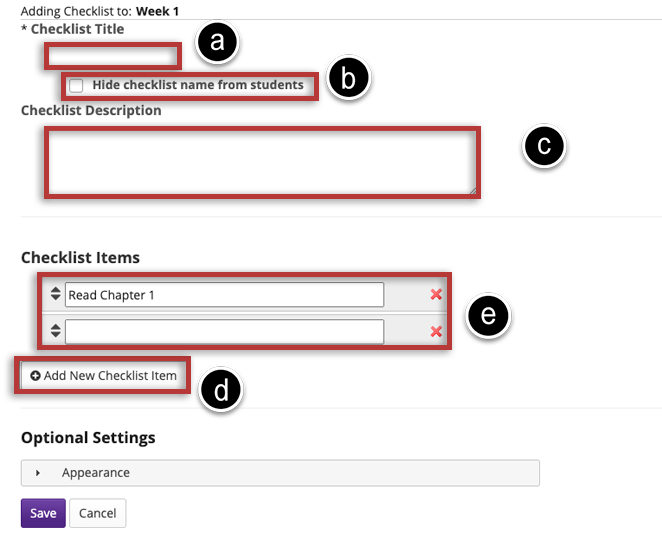
Complete the configuration of the item:
-
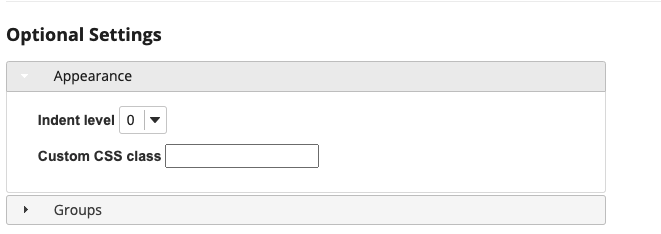
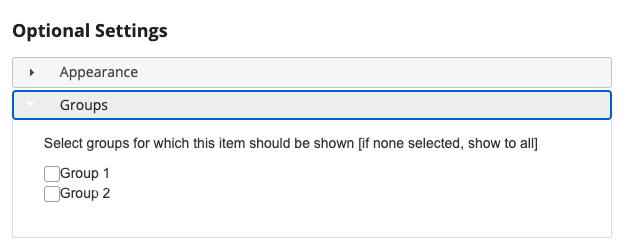
Enable/disable the Optional Settings as necessary.
-
Click the Save button.

Adding LTI/External Tools
-
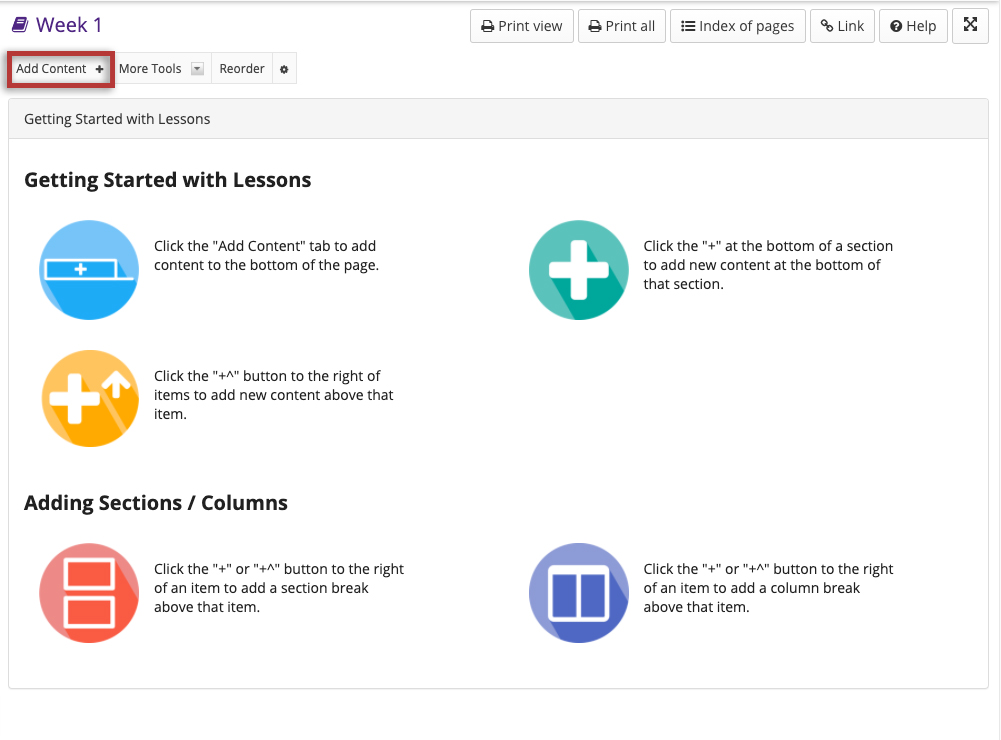
Navigate to a lesson page and click the Add Content tab.
-
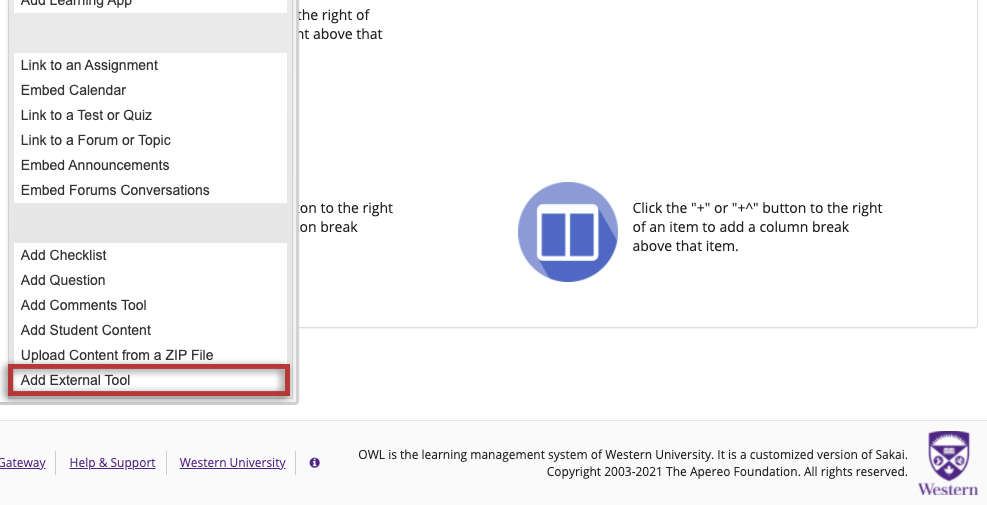
Click the Add external tool in the dropdown.
-
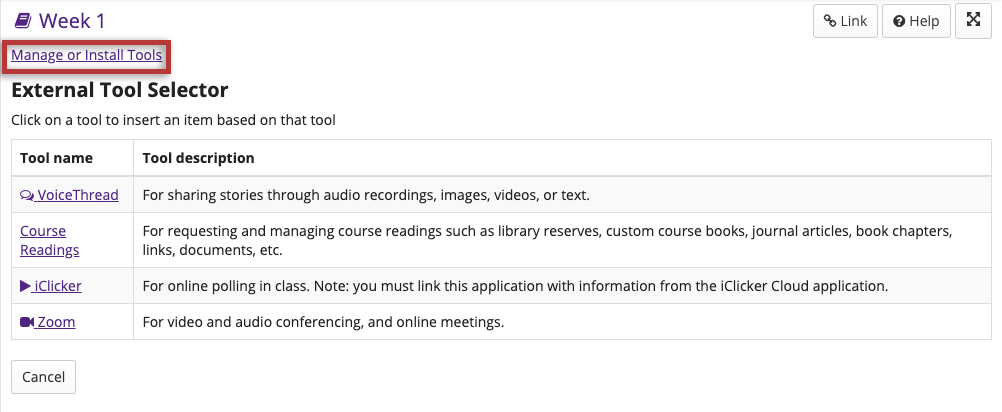
Click Manage or Install tools.
-
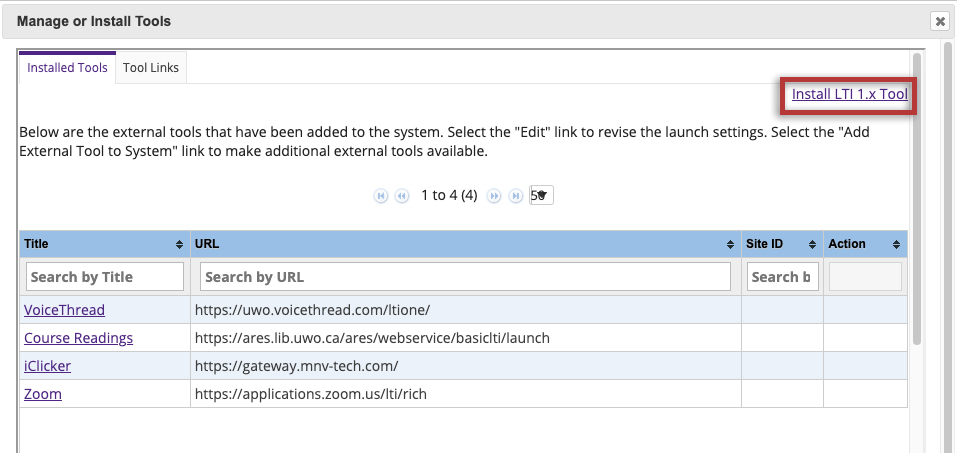
Click Install LTI 1.1 Tool.
-
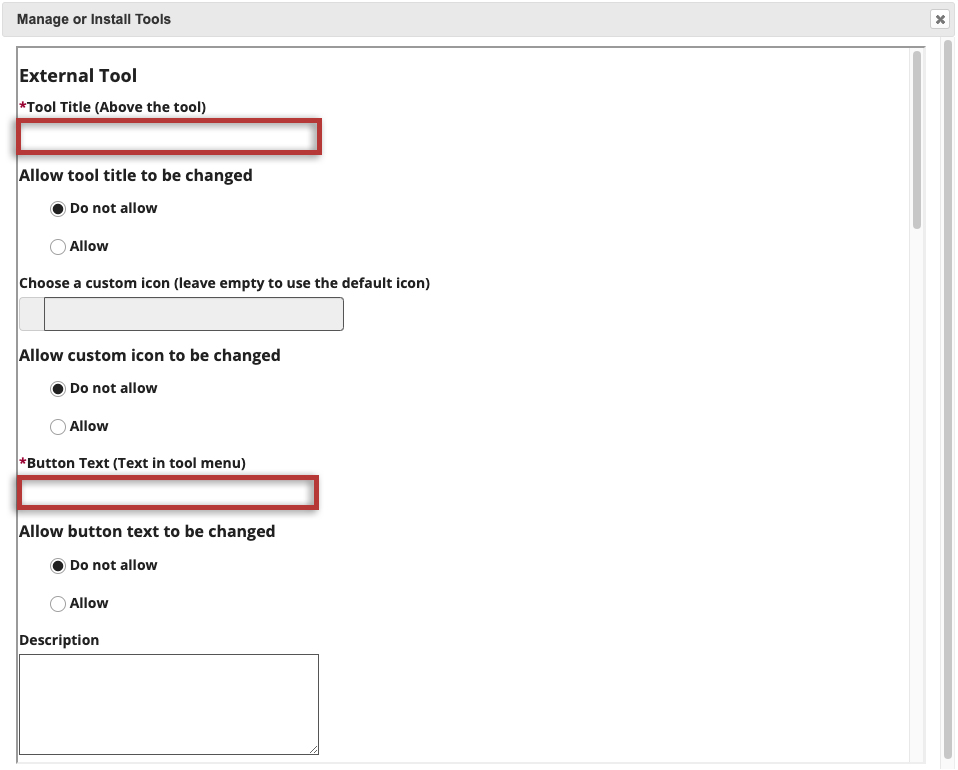
Enter the name of the tool in the Tool Title (Above the tool) textbox and the Button Text textbox.
-
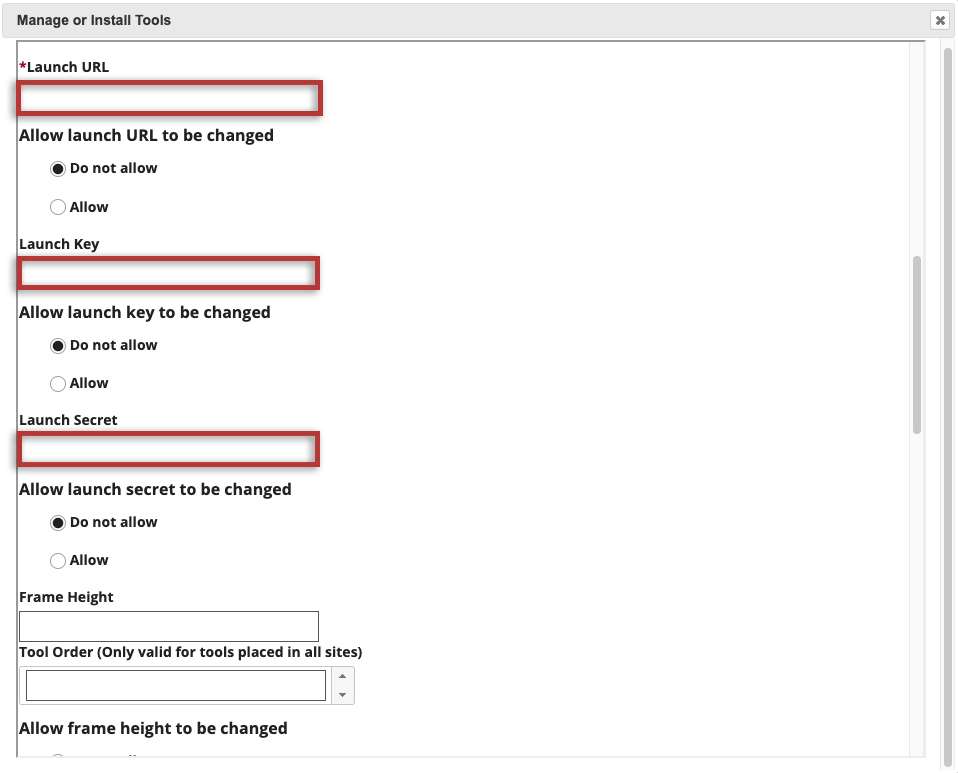
Input the Launch URL, Launch Key, and Launch Secret into the corresponding textboxes.
Note: You should receive these from the LTI vendor.
-
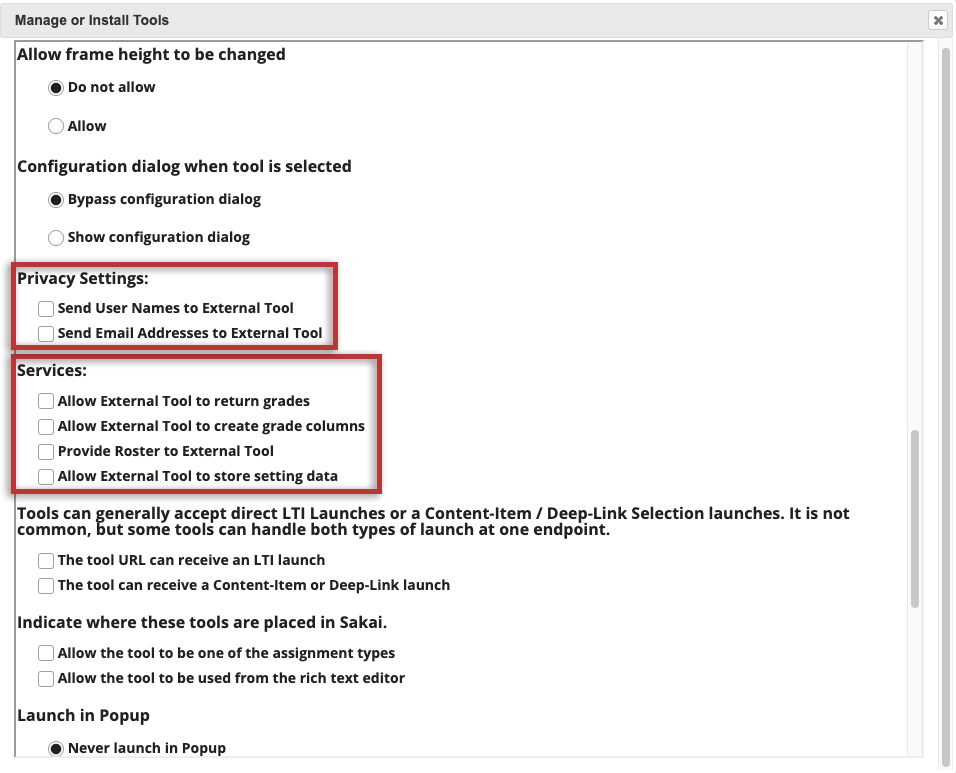
Contact the vendor to validate which Privacy Settings and/or Services to select from this list.
-
Click Save.

-
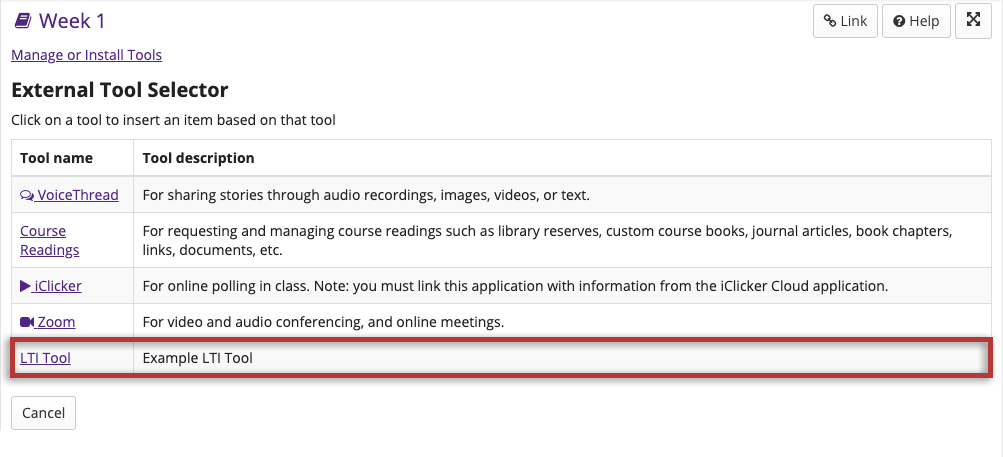
Refresh the page. Select the tool you'd like to integrate from the list provided.
Note: Your newly added tool should appear at the bottom of the list.
-
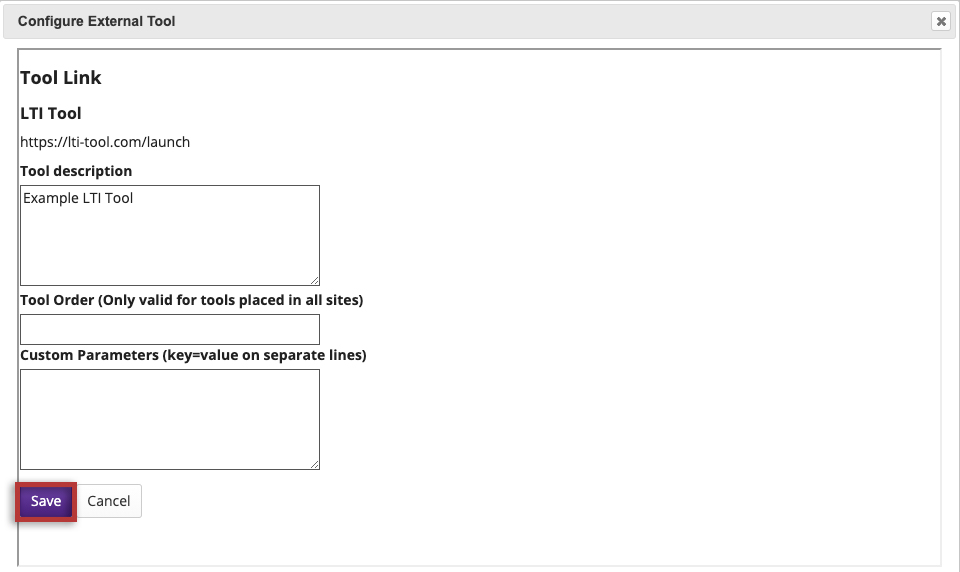
Click Save.
-
The link to your newly integrated LTI tool should appear on the lessons page.

