Manage site tools
Add Tools
OWL has many different tools available to use in your course or project site. You may choose which tools you want to use and may add or remove tools at any point.
-
Select Site Info from the Tool Menu in the site.

-
Click the Manage Tools tab.

-
Select your set of tools.
As you select tools from the "General" list on the left side of the screen, they are added to the "Selected tools" list on the right side of the screen. The right side of the screen displays the tools you have selected.

-
Add multiple instances of some tools. (Optional)
The Lessons tool may be used as a single tool on the Tool Menu where students click to see all Lessons, or there can be multiple Lessons tools added to the Tool Menu so that each tool is a separate Lesson.
The Web Content tool points to any URL you enter and you may create as many of these as you want.
Click on the More Lessons Tools? or More Web Content Tools? drop-down menus to add additional instances of these tools.
Example: Multiple tool instances.
The example above shows three Lessons tools (Module 1, Module 2 and Module 3) and two Web Content tools (Google and Western University).


Example: Multiple tool instances.
-
Click the Continue button.
Once you have made all of your tool selections, scroll down and click Continue.

-
Confirm tool selection
New tools added are shown in red font. Confirm that these are tools you want to add and click the Finish button. New tools are typically added to the bottom of the Tool Menu once you save your changes.

Reorder Tools
The Tool Menu can be customized by the instructor of the course to modify the order or appearance of menu items in the site.
-
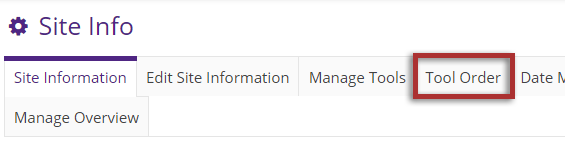
Select Site Info from the Tool Menu in the site.
-
Click the Tool Order tab.

-
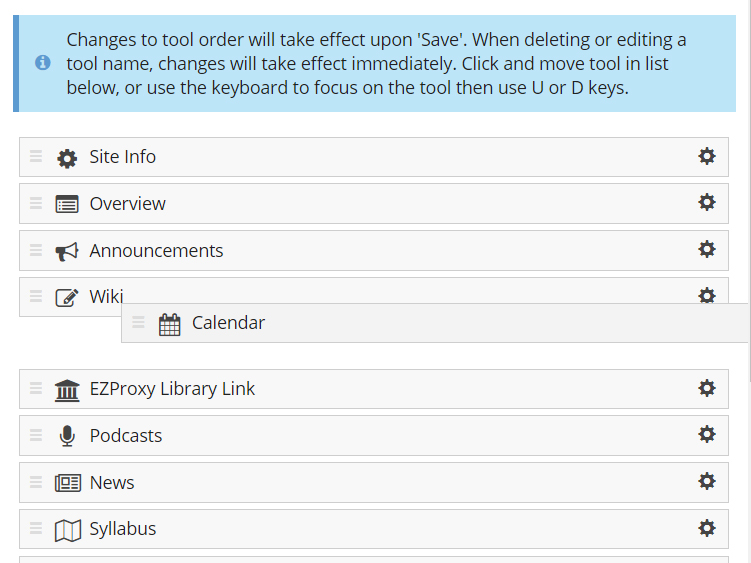
Click and drag items to rearrange the tool order.
Click the Save button at the bottom of the screen to save your reorder.
-
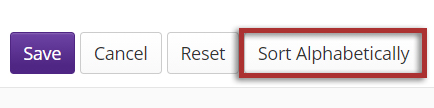
Sort tools alphabetically.
Click the Sort Alphabetically button at the bottom of the page to arrange all of the tools in alphabetical order by title.
-
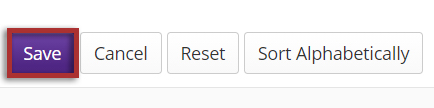
Save your work.
Once you have completed all of your changes, click the Save button at the bottom of the list.

How do I rename the items in the Tool Menu?
-
Click the Tool Order button.
-
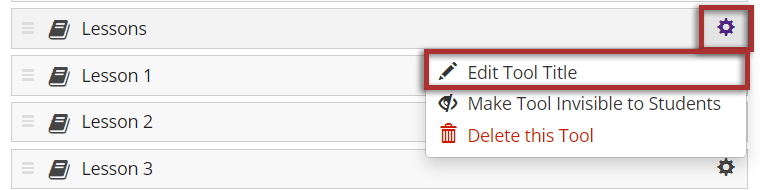
Rename a tool.
Click the gear icon to go to the tool settings. Then, select Edit Tool Title from the drop-down menu.
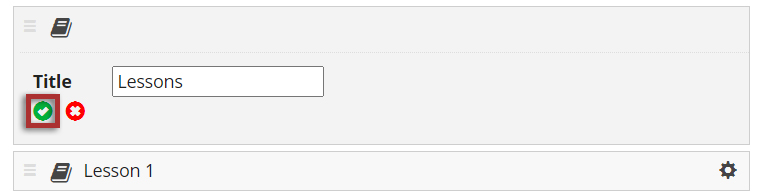
Type the new name for the tool.
In this example, the Lessons tool was renamed as Module 1. Click the green check mark to save your work.
-
Save your work.
Once you have completed all of your changes, click the Save button at the bottom of the list.

Hide Tools
-
Click the Tool Order button.

-
Hide a tool from students.
Hiding a tool from students allows them to access the tool from other areas of the site, but they do not see it listed in the Tool Menu.
Click the gear icon to go to the tool settings. Then, select Make Tool Invisible to Students from the drop-down menu.
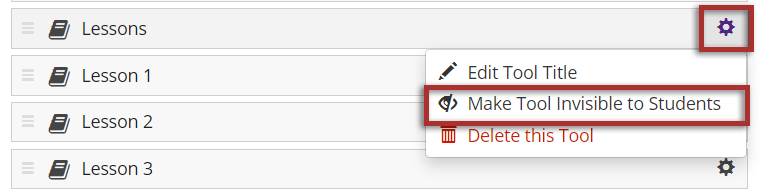
Invisible tools are indicated by a "hidden" icon in the tool order list.
-
Save your work.
Once you have completed all of your changes, click the Save button at the bottom of the list.

Lock Tools
-
Click the Tool Order button.

-
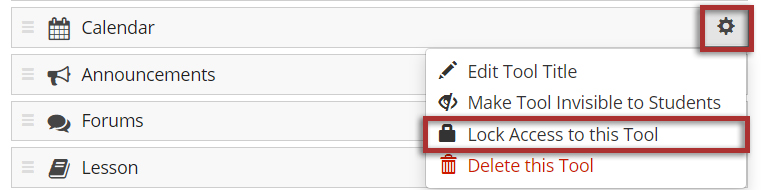
Lock access to a tool.
Locking access to a tool disables it for student use. Students will not see it on the menu, and they also will not be able to access that tool from other areas of the site.
Click the gear icon to go to the tool settings. Then, select Lock Access to this Tool from the drop-down menu.
Note: Not all tools are lockable. If the tool cannot be locked, that option will not appear in the drop-down menu.
Locked tools are indicated by a padlock icon.
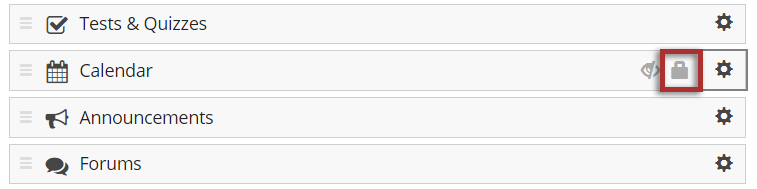
Locked tools are indicated by a padlock icon.
-
Save your work.
Once you have completed all of your changes, click the Save button at the bottom of the list.

Delete Tools
-
Click the Tool Order button.

-
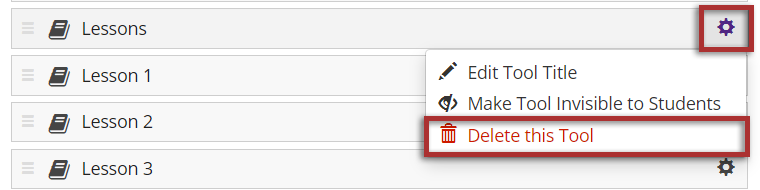
Delete a tool.
Deleting a tool has the same effect as removing a tool using the Manage Tools option in Site Info. It will remove the tool from the menu and deactivate it in the site, but it will not delete any content that exists within the tool.
Click the gear icon to go to the tool settings. Then, select Delete this Tool from the drop-down menu.
Note: Not all tools can be deleted. If the tool cannot be deleted, that option will not appear in the drop-down menu.
-
Save your work.
Once you have completed all of your changes, click the Save button at the bottom of the list.